Showing posts with label tag. Show all posts

Monday, 28 October 2019

Halloween Tag with Aztec Paints

Hello Colourcraft friends.  Gail here today with a Halloween themed tag.  I have a friend who was lucky enough to be born on the most spooktacular day of the year so I needed a tag for the gift.  


I started by cutting a piece of corrugated card with Gummiapan large Old Tag die.  I painted it with Blue Aztec Eco Lustre Metallic Paint.  When it had dried I over painted with Purple Aztec Eco Lustre Metallic Paint.  The resulting colour reminds me strongly of shot silk.   The bubbles you may be able to see in this picture disappeared once the paint was dry.


 I cut the spooky house, bats, moon and words using Sizzix dies and some scraps left over from my mermaid project.  I had painted some card with Charcoal Aztec Eco Lustre Metallic Paint and then added some gold splats.  


A bit of recycled sari 'wool' and the tag is done.

I hope you have enjoyed my project today.  Don't forget there is a Create With Colourcraft fan group over on fb where you can share all your makes using Colourcraft products.  See you there.  Hugz

Monday, 30 September 2019

Autumn Tag with Brusho's and Aztec Paints by Gail

Hello Colourcraft friends.  Gail here today with an autumn themed tag.  The leaves are falling, and some of them are even going pretty colours before dropping to the ground.  I love the rich warm colours of autumn and I've used a combination of Brusho's and Aztec paints to capture that.


I used my Brusho Travel Palette and diluted some Orange and Scarlet Brusho powder in water and applied it as a watercolour wash to a piece of card.


I sprinkled some more of the Orange and Scarlet on the wet card and spritzed with water.

 
I coloured a scrap of card with Gold Aztec paint and added a little bit of the Scarlet brusho powder.  I stamped and embossed the fox and fussy cut.


I used Pink Aztec paint to add some splatts to my card panel and Charcoal Aztec paint to paint a scrap of card to die cut my word from. 


I cut the tag using Gummianpan's Old Tag die and backed it with a piece of black card to really make the colours pop.  Add the fox, word and a little bit of autumn coloured wool and done!!

I hope you liked my project today.  Keep warm and don't forget to share your makes using Colourcraft products over in the Create with Colourcraft fb group.  Hugz.

Wednesday, 25 September 2019

'Happy' tag with Karen


I have used this month's theme of autumn colours to create a tag that I can hang on the wall. The photo of this lady just makes me smile everytime I look at it so I wanted to be able to see it often!


I started by colouring a sheet of waterproof paper using acrylic inks in autmnal colours. These were dropped on to the sheet when it had already been sprayed with water so the colours run and pooled together for soft shades of colour. I colour-matched some ribbon by dragging it through these colours while the sheet was still wet.

At this stage I have to apologise for the lack of photos: I took lots but, when I came to look at them, all I had was a bunch of error messages: The card had failed so this is all I have of the materials gathered ready to create the tag! This included a rectangle of Lutradur fabric.

The wooden tag was prepared with a coating of clear gesso and then layered with scraps of book paper. For more layers and texture, I stamped the tag with a text stamp and a mix of white acrylic paint with the tiniest touch of yellow mixed in to make a light cream colour. I particularly wanted to point out the rectangle of Lutradur which I heated round the edges to get a lovely wrinkled and lacy effect. I also sprayed it lightly with Bronze Shimmer Spray.

The coloured sheet of paper, also lightly sprayed with Bronze Shimmer Spray, was die-cut in to flowers and these were layered with some sequins to embellish the tag.

I hope this tag has made you smile. Thanks for reading.
Karen

Materials:
Acrylic Inks
Eco acrylic paints


Monday, 16 September 2019

Autumn Tag with Aztec Paints

Hello Colourcraft friends.  Gail here today with an autumn themed tag I made using Aztec paints, dies, a stamp and an embossing folder


I started by painting a piece of watercolour paper with


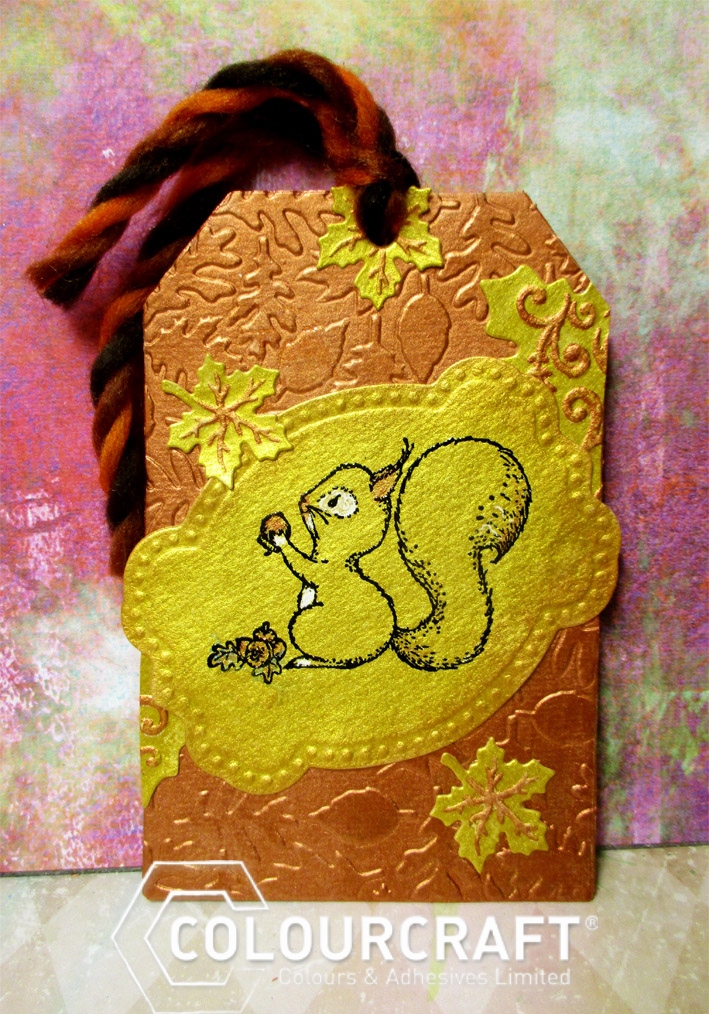
I backed the copper coloured paper with some card and cut my tag.  I used some Spellbinder dies to cut a label and some leaves.  These dies can also emboss, so I did that, then painted the embossed areas on the leaves with the copper paint.  I also lightly sponged the edge of the label with the copper paint as well.  


I thought the tag looked a bit flat so I embossed with a leaf embossing folder.  I love how card and paper painted with these Aztec paints looks so beautiful when embossed.  


I stamped the label with Heartfelt Creations Squirrel, added a bit of white gel pen and a tiny touch of the copper paint and arranged the label and leaves on the tag.  A bit of autumn coloured wool and done.  

I hope you have enjoyed seeing my project.  Thanks for visiting.  Hugz
Saturday, 24 August 2019

A little bit of paint and a lot of fun

I just love the metallic paints. They shimmer and enable you to create a depth and texture which is fabulous.  I particularly like the way this 'wall' has turned out. Hope that you will have a try!


I cut a tag from a piece of white 300gsm cardstock to create a good sized tag and I used a piece of sea sponge and all four of these colours whilst painting.

Using a 'brick' stencil, I picked up a little of the first colour - copper - onto my sponge.  I dabbed it off onto a scrap piece of paper as I didn't want it to 'leak' through the stencil which it can easily do. The trick here is to build up the colour gradually.  That way, you will end up with a nice clean image on the other side.  The paint dries very quickly, so each colour can be layered on top of the previous one almost straight away. This is so much fun as there is no right or wrong way to do it! And if you don't like a particular 'brick' you can just dab some more paint over it with different colour.  Remember also, that each brick can contain several different colours.


This is what my 'wall' looked like when I was finished. It doesn't matter that the bricks aren't exactly square; after all, real bricks change as they age. You can see the shine from the metallic paint here.


The next thing that I did was to stamp the image with Versafine onyx black ink.  I then used a very fine paintbrush to paint in small parts of his wings with some gold paint.  I also used a charcoal pencil around the edge of the whole image which I 'smudged' with a paper pencil.  This gives the impression that the image is sitting 'on top' of the 'wall'.


To add extra interest I used a blending sponge and some onyx black ink through a stencil. As versafine ink is not permanent until heat set, I gave it a few minutes blast with a heat gun.


I punched a hole in the top of the tag and threaded some soft ribbon through it.  I hope you like it and that you will give it a try.  The paints are really fabulous. :)


Monday, 27 May 2019

Man In The Moon Mixed Media Tag by Gail

Hello, Gail here today with a mixed media tag that was really fun to make.
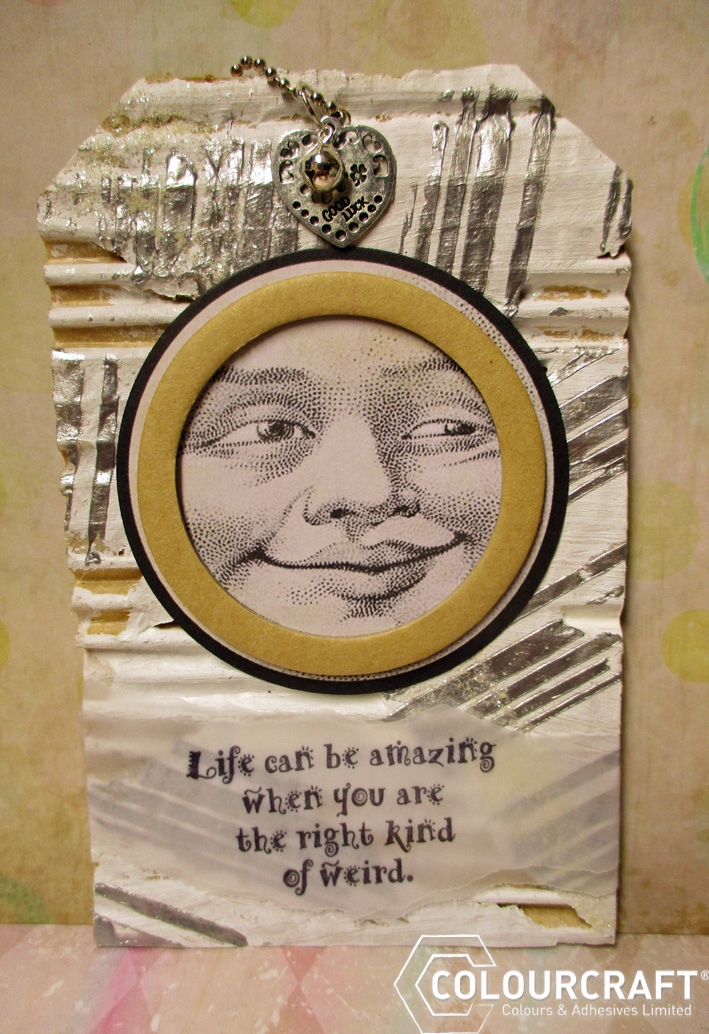
I found a piece of MME patterned paper with a big moon face on it and decided to make a corrugated card tag with Silver Aztec paint stripes and Brusho SprinkleIt bling!! 


I cut a tag shape from a piece of corrugated card and ripped off some of the covering paper to expose the corrugations.  Rip until you are happy with the look.


I used White Eco Acrylic Paint to roughly cover the remaining flat areas and the top of the exposed corrugations.  I also worked some into the lower corrugations, making sure I left some areas unpainted.  Then I used Silver Aztec Eco Metallic paint through a stripe stencil, varying the stencil orientation for added interest.


I used a brush with water and wet a broad stripe from the top left to bottom right side of the tag.  Then I sprinkled Brusho SprinkleIt Iridescent Flash.  I used a dry brush and tried to remove some of it from the silver stripes.  This stuff sticks to wet really well!!!


I added the moon face cut from the patterned paper and framed with a chipboard ring.  I added some metal charms from Korthobby, a goodluck heart and a small bell, cos jingles are such fun, and attached it all on a ball link chain,


The sentiment is from Carmen's Veranda, stamped on ripped vellum. 


Thanks for dropping by.  I hope you have time to be creative today.  Hugz

Wednesday, 8 May 2019

Mixed Media Spring Tag by Karen

Spring is fully underway here and I am seeing birds nesting everywhere at the moment so that was my inspiration for today's project.

I started off with a wood support and applied transparent Design-It paste (previously Soft Form Paste) through a tree stencil. Now spot the 'deliberate' mistake! I forgot to mix in my brusho powder before applying the paste! Happy accident: Time to experiment by adding the powder on top and seeing how it would react. I helped it move a little by spraying water over the top and then left it to dry and for the paste to turn transparent. It resulted in a lovely charred bark effect which reminded me of pyrography: That could be handy for a later project.

While the paste was drying I applied Leaf Green and Light Brown Brusho Crystal Colours to one watercolour paper for the nest and mostly Cobalt Blue with a touch of Turquoise and Prussian blue to a smaller piece for the bird. I used plenty of water and tilted it back and forth to make the colour cover the paper and then left these to dry.

As I thought about the composition and decided to add some leaves in to the background, I coloured another small paper with Sea Green and Leaf Green Brusho Crystal Colours and added more Leaf Green and some Sunburst Yellow to one side of the larger paper. You can these below along with the texture and shine created by the Design-It paste.

Making sure to mix in the Light Brown Brusho Colour first, I continued the stencilling to the bottom of the tag and added paste across the reinforcer and round the edges.

I stamped and cut out my images using a text stamp for the nest. I repeated this to cut the strips of words to glue just by the edges in all directions like twigs protruding from the nest. You can see how this was done below.
After highlights were added with a white gel pen and an eye was created with a dot of dimensional enamel I think my birdie looks quite settled in her nest.

I hope you like this springtime creation. Thanks for stopping by.
Karen


Related Posts Plugin for WordPress, Blogger...