Monday 30 October 2017

Winter canvas by Terri Koszler

Today I am sharing a winter canvas I created using lots of yummy Colourcraft goodies.

As the cold weather and dark nights descend upon us I can't help but get excited for the festive season. I decided to make a home decor piece which will be put on display at Christmas.


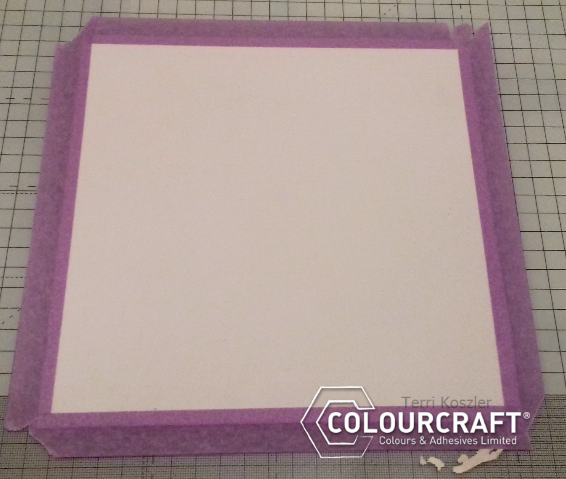
I started by cutting a piece of Canvas roll to 8x8" and taping it to my glass cutting mat.


I then used a brayer to add a layer of Pearl Aztec metallic paint. Hopefully you can see the sparkle in the picture below.


I spritzed the canvas with Several Brusho sprays in blues and purples and allowed it to dry. I then applied some Expand-it paste through a stencil and heated it with my heat gun to allow it to expand. I then flicked some silver brusho acrylic spray  onto the surface.


On some white card I sprinkled some Sandstone and purple bruho then sprayed with water. I gave it a blast with the heat gun and then spritzed with charcoal acrylic brusho spray and  silver and turquose  acrylic shimmer sprays. I allowed this to dry naturally and then stamped and heat embossed some Christmas foliage and a poinsettia flower onto the background I created. I then used some coordinating dies to cut them out.


I used a hot glue gun to add the flower and foliage to my canvas which I adhered to a piece of wood. I also cut the words merry Christmas from silver mirror card to add to my canvas.


Here what it looks like when all the pieces were added.


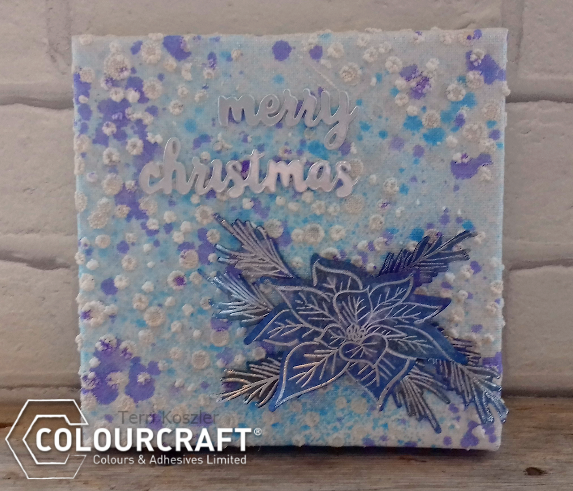
It reminds me of a snowy winter scene. 


I hope you've enjoyed todays project, I'd love to knpw what you think so please leave me a comment below.

Terri


Friday 27 October 2017

Expandit texture in a Wintery landscape by Rebecca Yoxall

Hey lovely people!

Hope you're feeling fine on this last October Friday.

I've been mucking around with a great product called 'Expandit' and have put together a bit of an Autumnal/wintery landscape showing how the Expandit can be used as 3 dimensional element to any of your arty endeavours. Expandit is a paste that bubbles to form a foamy sponge when heat is applied. Have a look and let us know what you think :-)


For the first stage I used Purple, Burnt Sienna and Turquoise Brusho on good quality watercolour paper. Wetting the paper with water then painting smooth washes of Brusho colours in streaks creates a beautiful backdrop.


I tend to sprinkle and amount of Brusho powder onto a palette and add water gradually with a pipette to achieve an inky consistency then apply to the paper with a soft bristle brush. It may be helpful to use a different brush for each colour.


I gave the wash a little time to dry but whilst there was still a slight dampness to the paper I sprinkled some of the burnt sienna in the bottom corners. You can see from the image below that the right hand corner was much wetter and the Brusho crystals have spread further. Either is fine as I then squirted water from a spray bottle to liven up the left Brusho particles.


Using a bamboo dip pen I scratched twigs/stems/seed heads through the sprinkled Brusho


and built it up so that there appears to be a tangle of wintery stems.


To allow a bit of lightness and tonal contrast I sprayed again with a bleach solution. As you can see from the below image I clearly label any bleach materials and use with extreme caution.


Once completely dry I could get to work with the amazing Expandit product. I used a plastic palette knife to apply a liberal amount in a stylised stem shape (cow parsley/hogweed)


The thicker you apply the Expandit the more it will bubble and the more raised up the texture will be. I applied heat with a hot hairdryer, but a heat gun is probably best. (you can also iron on the reverse)
It's quite mesmerising to watch it expanding and growing.


The Expandit can be left in it's original colour or tinted with Brusho and or Brusho acrylic mist spray. I used the Turquoise Shimmer mist spray to further enhance the wintery theme. Then using a white gesso (or white acrylic) I painted extra details for the white leaves and bigger seed heads.


Often the shape of your brush stamped down onto the paper will give a perfectly good leaf shape. And that's it! My Autumn/Winter hedgerow using Brusho and Expandit.


I hope you are enjoying the Colourcraft blog. Please leave us a little comment to tell us what you think.
Bec
:-)


Wednesday 25 October 2017

Christmas canvas by Kate

Hi, 

I would like to share with you romantic Christmas canvas. I love Christmas crafting and with Brusho acrylics sprays it is so easy. I also like to combine products for papercrafts and for floristics. 

Base of my canvas is shaped MDF (made by my friend who owns laser). I applied white gesso over whole canvas. Than I used paste to create some texture with snowflake stencil.  Than I glued different embellishments - plastic flowers, pinecones, die cut leaves, pebbles and also cute wooden reindeer. At one side I made whole arrangement. I also used some art stones just to add even more interest and wax for defining edges of my snowflake canvas.

And now the fun part - colouring with sprays. I wanted to have red-gold-white canvas. So my choice was Acrylic mist spray - scarlet and Acrylic shimmer spray -  shimmer gold. That combination is really awesome and as you can see colours added really nice final touch to my canvas. When you do not want to have "sharp" splatters you can always dilute them with bit of water. 


I hope you like my inspiration
Have a nice day
Kate


Monday 23 October 2017

Easy upcycling project with a surprise ingredient - Ewelina

Hi!
You've probably read my title and thought... What the heck is her surprise ingredient?! What is she talking about?!
Hold your horses and let me start from the beginning! hahaha


I had those IKEA plain hanging cups for a while now - they mainly serve me as paint brushes/palette knifes/paper straws/lace pieces holders. Basically, they are my go to storage for stuff that I need close to me when crafting; I attach them to the top basket of my trolley and wheel them somewhere with easy access from where I sit.


After having them white and plain for quite some time, I decided that it was time to put some life in them and make them more 'environmentally appropriate' - meaning covered in paint! hahaha


So I dug out a roll of masking tape to create an even border for the paint not to spill out and create irregular lines - I have to admit that straight lines are not my forte!

Now it was time to figure out which paint to use and to be perfectly honest with you I wasn't sure which of my hundreds of jars, tubes and bottles contained something that would stick and look good on plastic...


...so I decided to be adventurous and go for the (probably) least obvious choice - fabric paint! Yes, this is the surprise ingredient I mentioned in the title! I used 3 of the Metallics - Gold, Copper and Bronze. 


Three layers gave the effect I was looking for - good coverage and lovely, warm shimmer.
By the way, make sure you thoroughly dry each of the layers before adding the next one. You can let it air dry or (if you're impatient like me) use your heat gun - just dot get too close to avoid bubbling up the paint.


Once the las layer was dry, all that needed doing was to carefully remove the masking tape.


That's it! Quick and easy!


The cups look like new!


Hope you like the idea and maybe you'll also be tempted to give it a go yourself.
It surely is worth trying it out because... I just love how they look on my teal trolley!!!

See you soon!


Related Posts Plugin for WordPress, Blogger...