Showing posts with label Sarah Allan. Show all posts

Saturday, 9 March 2019

Easter Bunny Cards

Hello Everyone,

I have some super quick, fun and easy Easter bunny cards to share with you today..

The Colourcraft products that I used today were Acrylic paints in various different colours along in conjunction with my jelli-print plate to create fun mixed media backgrounds to then use as my easter bunnies.


Step 1

Create your jelli print backgrounds using your Colourcraft Acrylic paints, jelli plate, brayer, and stencils.


Step 2

Die cut your bunnies from your newly printed papers


Step 3

I used a script stamp dipped in a thin layer of acrylic paint to add additional detail to the bunnies


Step 4

Glue a pom-pom tail onto each of your bunnies


Step 5

Cut your mats and layers for your cards, the coloured card layer was cut at 3.25" x 3.25" and the black layer is 3.5" x 3.5" and the card bases are 5" x 5" square.


Step 6

Assembly time... glue your bunnies to the coloured layer, then stick this to the black layer and then I used foam adhesive squares to give it some dimension before applying the bunny toppers to the card bases.

I hope you enjoyed todays cards, a super quick and fun easter card idea!

Thank you for popping in and I shall see you in 2 weeks with another project

Sarah x


Saturday, 23 February 2019

Spring Home Decor : Birds Nest

Hi Everyone,

Sarah here with you today on the blog and I have a super quick and easy easter/springtime project for you!.


Step 1

Take a paper plant pot and apply a layer of white acrylic paint over the surface, a bit like dry brushing, so that you don't get full coverage, as we are going for a shabby rustic look


Step 2

Dig around in your stash for some lace, trims and fibres, I layered 3 together to make the easter nest look pretty.


Step 3

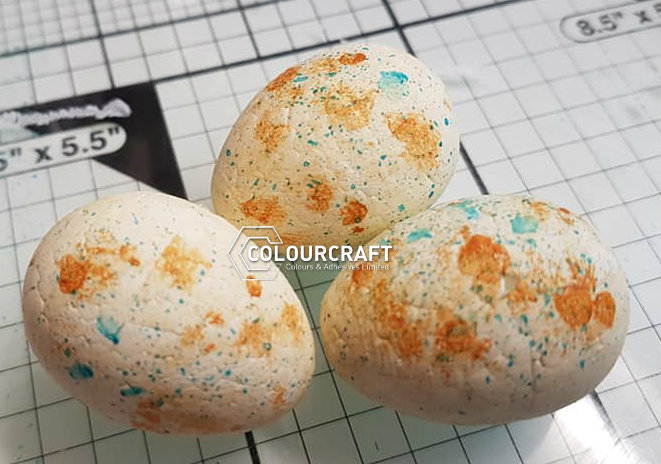
Paint your polystyrene eggs with a layer of gesso, then paint with a layer of titanium buff, and speckle them with burnt sienna and turquoise.


Step 4

I scrunched up some raffia into the pot and arranged my speckled eggs inside to complete the project


I hope you enjoyed today's project, this took me less than an hour to complete and would make a great addition to your spring/easter themed home décor

See you all next month with more fun projects

Thanks for visiting today

Sarah


Saturday, 9 February 2019

Spring is in the air

Hi Everyone...

Hope your weekend is off to a fabulous start!

I have a handmade book to share with you today,  the products featured in this project are Colourcraft's Acrylic Paints, Sprays and Soft Form Relief Paste.


Step 1

Take 3 pieces of mat board and glue down onto a paper of your choice, I used some patterned paper with spring green colours.


Step 2

Mitre your corners and apply a strip of double sided tape around the outside edge


Step 4

Remove the adhesive tape and stick down your edges


Step 5

Flip your book cover over and take a stencil and apply a layer of Soft Form Relief Paste over the top of the stencil, remove stencil and dry with a heat tool.. at this stage I used a paper piercer and pierced holes around the edge of the book cover at 1/4" intervals.


Step 6

Using sprays and acrylic paint, decorate the cover of the book, until you get the look you fancy, I use white acrylic paint to knock back the intense colours of the sprays.


Step 7

I stitched some plain hemp cord around the perimeter of the book, added the signatures and the project is complete.


I hope you like todays project and look forward to seeing you all in a couple of weeks time with another spring themed project.

Sarah x


Saturday, 12 January 2019

Valentine Heart

Hello Everyone,

I have a fun project for you today, using a wooden heart, bits and bobs from my craft desk and some wonderful Colourcraft Products.


Step 1

Take wooden heart and apply a layer of white gesso and dry with heat tool


Step 2

Fix down various bits and bobs from your supplies to your wooden heart using matte medium and dry with heat tool.


Step 3

Paint another layer of white acrylic paint over the top of your heart surface and dry with a heat tool.


Step 4

Using Colourcraft acrylic sprays of your choice, (I used scarlett and copper shimmer) spray over the entire surface of your heart and dry with your heat tool.


Step 5

I used Gold SprinkleIT mixed with water to create a highlight wash to brush over the top of the heart surface and dry with a heat tool.


Step 6 

I used a chipboard "love" word and painted with black acrylic paint and dried with a heat tool, before fixing to the front of the heart.


Step 7

I added some dark brown lace trim around the edge of the heart to finish it off


This completes the project for today, thank you so much for popping round and I shall see you all again soon

Sarah x

Saturday, 29 December 2018

Winter Shimmer Frame

Hello Everyone,

Hope you all had a lovely Christmas ..

This is my final post for 2018 before we welcome in a brand new year and more exciting projects for you all...

For my final post, I wanted to make something quick, and something that we can all make.   I have taken a plain wooden photo frame and given it a winter shimmer makeover..


Step 1

Take a plain wooden photo frame, this one was from my local crafting shop and was £1.30, inexpensive to buy and when transformed looks fabulous, remove the stand and glass from behind.

Step 2 and 3

Paint over the whole surface of the frame with white gesso and dry with your heat tool, then take a stencil and place over the top of the gesso'd frame surface and apply a thin layer of soft form relief paste and dry with your heat tool


Step 4

Apply another layer of gesso over the top of your stencilled frame and dry with your heat tool

Take some Aztec Pearl metallic paint and pain over the entire surface of your frame and dry with your heat tool


Step 5

Time to assemble your photo frame, choose some nice sparkly paper  or photograph and trim down to size using the glass window of your frame as a template, then assemble frame and display in your home


Thank you for popping round and your continued support this year, looking forward to seeing you all in 2019.. and wishing you all a very happy new year

Sarah x


Related Posts Plugin for WordPress, Blogger...