Showing posts with label Brusho. Show all posts

Monday, 25 May 2020

Tropical Fish Card with Brusho

Hello Colourcraft friends.  Gail here today with some tropical fun.


I started by cutting three 2.5" diameter pieces from white card.  I was thinking artist trading coins and I usually make them in threes cos they fit perfectly across a piece of A4 card.  I used a stitch edge die and then stamped using a fish from Rubber Dance Textured Fish set.


I masked the fish, stamped with Rubber Dance Grungy Sequins and sprinkled with Turquoise and Sea Green Brusho powders.  I carefully removed the masks and spritzed with water.  The water can draw some of the colour across the masked fish, but I just used a paper towel to blot it away.


I stamped with a grid stamp and a water reactive blue ink, sprinkled with the Sea Green Brusho powder and spritzed.  The water spreads the Brusho colour nicely and also softens the grid stamping.


I selected one of the fish coins, edged it with dark blue ink and added it to the card base.  I die cut the word from white card and added it in the corner.

Thanks for visiting today.  I hope you have enjoyed my project. 
Take care, stay safe, craft on!!  Hugz

Friday, 22 May 2020

Magical Brusho Gel Print Backgrounds by Teresa

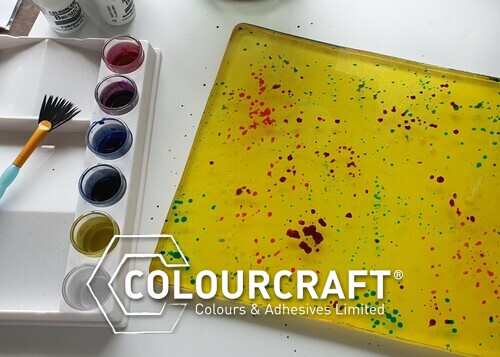
Hello and welcome to my final post for the Colourcraft team. One of my favourite tools is my gel plate, and I love experimenting with different products on it. Today I am using Brusho Crystal Colours to create magical backgrounds for some stamped cards:


I began by brayering a thin layer of gel medium over the plate:


Next I mixed up some Brusho colour with a little water in my sealable palette. The pots have lids so you can store the paint.


I took a fan brush and splattered the paint over the surface of the plate.


Next I spritzed with a little water to help the colour move on the surface.


I took a piece of watercolour card and pressed onto the plate to transfer the colour to the paper.


Once dry, I trimmed into two pieces for my backgrounds,


I stamped my design on the Brusho backgrounds, added some details with colour pencil and a white pen, then matted onto black card to finish,


Saturday, 9 May 2020

Make your own stencils for a Beautiful Brusho Garden

Hello Everyone!
Spring has sprung and the garden is getting out of control! One of the things I've been doing during these crazy times, is experimenting with journaling and online classes etc. One of the journal exercises I had a lot of fun with was by Karen Stamper. She did a lot of scribbling, painting, drawing- in a really freestyle form to make a garden drawing in black and white.
This is my version using hand made stencils and Brusho! And it is super colorful. Best part about it- you don't need to know how to draw at all!

First I decided to make some simple stencils. For this I needed a hot glue gun and glue sticks as well as freezer paper.
First I "drew" simple designs on the freezer paper with the glue gun. I peeled these off to act as one sort of stencil.  My second sort of stencil were free cut out of freezer paper.

 I gathered the rest of my materials...
I grabbed every shade of green Brusho I could find, a couple of Brusho SpraysSpray BottlesWax Resist Sticks, a fat candle, brushes, palette and a sponge.
First I drew on my paper with the wax resist sticks and candle- random scribble lines as well as repeating my leaf forms. Then I laid out my stencils.
Time for some super fun! I sprinkled and sprayed! My freezer paper stencils tended to curl up, so I flattened them out and held while spraying. Then let this dry.

I re-laid the freezer paper stencils in different parts of the piece and sponged on brusho that I had blended with water.
You also can rip out leaf shapes from other paper and sponge around them- or sponge inside a hole you ripped out in a leaf shape!
I had picked some leaves and laid them on a stamp pad- pushing down with a piece of paper on top and then stamping them into the painting.


After everything had dried, I went in with coloured pencils and added more details. It's hard to know when to stop!
Hope you enjoyed that and give it a try! Next time I'm going to try to get this effect onto fabric!

Friday, 8 May 2020

Brusho and Alcohol on Glossy Card

Hello!! Teresa here with a different way of using your Brusho powders. We all know that Brushos can be activated with water to create vibrant and interesting backgrounds, but have you tried mixing them with isopropyl alcohol??


Take a piece of glossy card stock (the type that you use with alcohol inks) and sprinkle Brusho over the surface.


Take a pipette and drip isopropyl alcohol over the surface. You will see that some colours activate a lot, some very little. Experiment with different colours of Brusho to find out how they react.


Allow to dry - you can use a heat tool (carefully) to speed this process. Then take a large soft brush and dust away any residual Brusho powder still on the surface.


Decorate your background with die cuts and a sentiment sticker.


The Brusho and alcohol create a soft dreamy background.


Try other colour combinations ( black, alizarin crimson, lime green, orange):


You can get some surprising effects.


Thanks for taking the time to stop by today!


Related Posts Plugin for WordPress, Blogger...