Monday 31 December 2018

'Art on the go' - canvas purse with Ewelina

Since I am such a creative person (yes, there is a hint of sarcasm in this sentence!), I decided that I cannot have my mini art journal and pens freely rolling around the bottom of my bag. Oh, no! So to make sure that, as usual, I take it to the next OTT level, I used a plain canvas cosmetic bag (Canvas Corp, of course!) and turned it into an artsy 'art on the go' holder.

Here's how it went...


My starting point was locating the cosmetic bag, deciding on a stencil and finding washi tape to keep the stencil in place (I have about 50 rolls so deciding on which can be so 'pointlessly wasted' was quite a task!).


Next, I attached the stencil and chose the colours to use on the front - shades of blue seemed like the right choice.


As the stencilling progressed, I made sure that I matched the design as I was moving along to make it all look neat and tidy... you know, professional!


Once the front was finished, I dried it using my heat gun before starting work on the back.


I chose another stencil for the back - a bunch of flowers - a stencilled the first layer using the same colours I used for the front. Let it dry.


I then chose 4 pinkish and 1 yellow paint and started layering the same stencil over and over adding more flowers and colours; you will see the progress if you follow the photo clockwise starting from the top right corner. 
I was drying the paint in between layers to avoid it smudging and mixing.
I really like that you can see the colour layers rather than having full coverage...

And... that's it! Done! Nice and easy!


I then stuffed my favourite mini Art Journal and some pens inside ready to go in my bag and on the road with me.


Knowing life, I will probably end up doodling around the flowers at the back which will make it even more artsy hahaha you never know, you might get an update when that happens.

Have a great New Year!!!


Saturday 29 December 2018

Winter Shimmer Frame

Hello Everyone,

Hope you all had a lovely Christmas ..

This is my final post for 2018 before we welcome in a brand new year and more exciting projects for you all...

For my final post, I wanted to make something quick, and something that we can all make.   I have taken a plain wooden photo frame and given it a winter shimmer makeover..


Step 1

Take a plain wooden photo frame, this one was from my local crafting shop and was £1.30, inexpensive to buy and when transformed looks fabulous, remove the stand and glass from behind.

Step 2 and 3

Paint over the whole surface of the frame with white gesso and dry with your heat tool, then take a stencil and place over the top of the gesso'd frame surface and apply a thin layer of soft form relief paste and dry with your heat tool


Step 4

Apply another layer of gesso over the top of your stencilled frame and dry with your heat tool

Take some Aztec Pearl metallic paint and pain over the entire surface of your frame and dry with your heat tool


Step 5

Time to assemble your photo frame, choose some nice sparkly paper  or photograph and trim down to size using the glass window of your frame as a template, then assemble frame and display in your home


Thank you for popping round and your continued support this year, looking forward to seeing you all in 2019.. and wishing you all a very happy new year

Sarah x


Wednesday 26 December 2018

Recycled and Repurposed with Suzi

Good Morning All, I hope you are all enjoying the festive season. One of the things about giving and receiving gifts it all the wonderful packaging they come in.  For my project today I'm altering a Whiskey Bottle Tube that my Dad had received; As he travels a lot he wants to use it to protect his Water Flosser, so he asked me to change it's appearance so it doesn't raise questions from the Customs Staff.

As a starting point I took some old map paper and collaged it onto the tube, followed by a layer of White Gesso;
I then took a stencil and applied clear embossing ink through it and coated with clear embossing powder;
I then heated it with my Heat Gun;
Then it was time to add some colour, I took the tube and put it into an old cardboard box that I use as a spray booth to catch any excess sprays. I add a layer of colour with Turquoise Brusho Acrylic Mist Spray and some water.
I then added a layer of Sea Green Brusho Acrylic Mist Spray and water.
Then I dabbed away some of the colour from the embossed areas before drying the tube with my heat gun. Here's a couple of views of the dry tube;

I wanted to add some stamping to my project, so I decided to stamp some images with permanent ink onto to deli paper; 

I stamped a few sheets of deli paper, so any leftover images can be used on future projects.  The deli paper will become barely visable once applied to the tube.  You could use tissue paper instead.

I then selected some images, and added them around the tube;

Once dry edges of the deli paper where more visible than I wanted, so I added some white gesso through a couple of stencils to blend the edges.  Here's a few views of the finished tube.


To make the tube more practical to use I added a couple of layers of spray varnish.

I'm fairly happy with how the finished tube turned out, in hindsight I would have probably added the stamped images before adding the colour; this may have blended them into the background a bit more. 

I hope you've found my process interesting, and you look at some of that leftover packaging a little differently now.  I pleased to say my Dad loved the finished tube, he's added some padding inside and it fits his Water Flosser perfectly, so will be put to good use on his next trip.

Thanks for visiting with us today, Enjoy the rest of the holidays, 
Happy Crafting
Bye for now
Suzi
xxx

Monday 24 December 2018

Leaping Deer Canvas with Brushos

Hello.  Gail here today and I would like to wish you all a very Merry Christmas.  In Scandinavia and much of Europe today is The Day!  I am going to be making dinner for the family and then we will be opening the presents!!  But first, the reason for my blue fingers!!  Nope, not the cold, although it is distinctly chilly here, but Brushos!!  I got quite 'hands on' whilst colouring and manipulating tissue paper and Brushos and I am wondering how long before the blue fades away.......  But I hope you will agree the final result is well worth a few days with blue fingers.

I've made a canvas using tissue paper for my texture and Prussian Blue, Ost Blue and Turquoise brushos for my colour.


I started with a 15 x 20cm canvas.  I coloured a piece of tissue paper with Prussian Blue brusho powder and plenty water, coated the canvas with wood glue and stuck on my coloured tissue paper, making sure there were lots of wrinkles.  


I coloured two more pieces or tissue paper with Ost Blue (top) and Turquoise brusho's and stuck them on the canvas, scrunching and shaping them to give maximum texture.  Then I added some Pearl Sprinkle IT.  It looks like white patches on the Turquoise and Ost. Blue, but is actually a lovely shimmery highlight.  


Then I decided it needed a deer and some snowflakes.  I was going to add lots of snowflakes in black, blue and white, but after adding the silhouette deer and the black flakes it suddenly felt finished.


Thanks for dropping by.  I hope Santa brings you lots of new crafty goodies to play with.  Have a lovely Christmas everyone and see you in the New Year.  Hugz


Saturday 22 December 2018

Fabric gift tags with Brusho and DesignIT

Hello and Happy Holidays everyone!
If you are like me and are always last minute with wrapping- but still want the look of your packages to make an impact, this is a fun way to make beautiful gift tags!


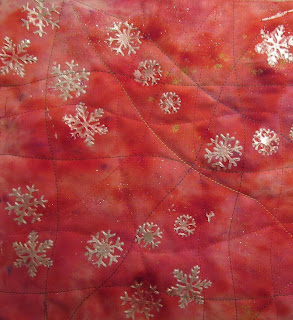
I started off with unbleached calico (muslin) fabric and several shades of red in Brusho as well as SprinkleIT in gold and iridescent gold and sprayed with water. 
I love love LOVE the effects I got! It's difficult to see how sparkly it is, trust me, it IS sparkly!
I let it dry and then took a stencil I found at a local discount shop with all sorts of holiday motifs and taped off all but the snowflakes.
I then took pearlescent DesignIT and scraped it through the snowflakes all over my cloth.

I waited for these to dry and then I layered it with a thin wadding and sewed randomly across the cloth with some different threads. 
I then cut this up into sizes that I sewed onto some store bought tags, and here they are!

I might add some charms, beads and/or sequins, time will tell!
I hope you enjoyed this project.
See you soon!


Friday 21 December 2018

Robin Wreath by Rebecca Yoxall

Greetings to you all.

How are we all on this fine Friday? 

I'm sharing a painting today of one of my favourite birds, the robin, set in simple wreath. I've used Colourcraft Acrylic Inks and metallic acrylic inks to produce the beautiful luminous colours and shimmer. These acrylic inks are fabulous to work with, very easy to blend with water, really versatile and perfect for pen and wash style. I hope you like him. keep reading and I'll show you how I brought him to life.


 I used a high quality watercolour paper and drew my robin with an HB pencil and a suggestion of the shape of the wreath. 


Using a full set of 12 inks I chose Crimson, scarlet, yellow, dark brown, ultramarine, emerald green and black to begin.


Using both the crimson and scarlet acrylic inks I brushed small amounts onto the breast of the bird with a touch of yellow too. I applied the colour in layers to build a lovely rich tone. 
Then the dark brown ink gave me the perfect shade for the robins head and wings. 


The pale area of the bird was painted in with a tiny tiny amount of ultramarine and dark brown mixed together with lots of water. And some more dark brown for the birds legs.


I then began to ink in the holly leaves with emerald green as an outline then filled in the middles with drops of both emerald green and ultramarine. This gives a nice subtle variegation to each leaf. I also left some white paper showing through the middle of the leaf to hint at a bit more detail.


My favourite, simple way of painting berries is to use a cotton bud. (choose recyclable not plastic)
Simply dip into the crimson ink and stamp away, putting little groups of 3 or 4 berries together


I decided to paint in some fir tree sprigs as well with the emerald green. I did this with a fine brush and flicked the paint from the middle of the sprig outwards so that the line painted thick from the middle to thin at the outside.


From here I went into 'decoration mode' and embellished the design with trailing twigs using the dark brown ink and a fine brush. I concentrated on both thicker lines and thinner curled sprigs to create a tangle of branches around the leaves and berries


I also have a set of the metallic acrylic ink colours which are devine to use. I nestled some extra foliage/leaf shapes using the gold ink and stamping the brush on the paper the capture a nice shape from a central stem.


The aquamarine metallic ink perfectly complements the the greens of the holly when over painted through the middles of the leaves and the gold splashed onto the robins red breast complements the gold leaves.

The final touch came with the black ink when I painted in the beak and eye of the bird as well as some shadows on the underside of the berries.


Thanks for stopping by. Wishing you a wonderful festive season and I will see you with more projects in 2019!

Bec

Related Posts Plugin for WordPress, Blogger...