Showing posts with label soft form relief paste. Show all posts

Wednesday, 20 May 2020

Art Journal Cover by Karen

For today's post I thought it was time I decorated the cover of my art journal. What to do if you want some texture but without things that will catch and tear? Tissue paper and different texture pastes was my answer.

Manila paper tends to suck the colour out of everything and I wanted to have a bit of white space so I started with a layer of white gesso, feathered out so there were no hard lines. Then I added a bit of light background stamping and stamped my title on to tissue paper.

I painted the back of the tissue paper white so that it would stand out against a coloured background...

and I added Turquoise acrylic paint to the cover, again feathering out to avoid hard edges.
For a pop of contrast and some texture, I mixed Magenta paint in to transparent relief paste (now called Design-It) and stenciled this over the other colours.

To take the title stand out more, I added a light touch of Cadium Yellow and used gel medium to stick down the tissue paper adding a coat under and over to be sure it was well adhered. I added a third lot of stenciling too.

Mixing Yellow and Scarlet paint for a bright orange, I added more stenciling and doodled round the stars and circles with black and white pens. I used Black Acrylic Paint to sponge round the edges of the cover.

For more texture and contrast, I stenciled Black Expand-IT paste on to the cover. I also added lines with the edge of a paint knife to the 'Art' letters, and heated the Expand-IT to puff it up for some volume.
I am sure I will continue to doodle or add to this over time but, for now, it makes me happy that my journal has a decorated cover in some of my favourite bright colours. It gives a hint of what is inside. More of that another day!

Bye for now
Karen
x

Wednesday, 8 April 2020

Mixed media canvas with Karen


This type of project is a great way to use up bits of your stash or even bits around the house because, for these types of mixed media canvas, it doesn't matter about shape, size or colour!

The base for my project today is an A5 artists board: A hard-backed canvas. However, a piece of wood or a stretched canvas of your chosen size would also work just as well. The first step is to then arrange your bits and pieces so you have a rough idea of where you want to glue things down. It is then critical to use a good gel medium like Liquitex Heavy Gel Medium or Golden Matte Medium to collage your objects on to the canvas. Use plenty and let it dry thoroughly as you do not want things to fall off later! This type of heavy gel will hold metals, plastics and just about anything, all layered on top of each other as long as they have plenty of gel to hold them and it is left to dry thoroughly, preferably overnight. In this case, I used a few scraps of florist ribbon, lace and some buttons so all relatively light.

As soon as I had stuck down one button, I decided to move it and that is a benefit of the slower drying time of gel on non-porous surfaces. For more texture, I used Design-It paste (formerly Soft Form relief paste) spread through a stencil with a paint knife. At this stage I then left everything to dry.

Once everything is completely dry and well stuck down, cover it all in gesso. You lose all the colour but keep the texture. Be sure to check from different angles to see that all the original colour has been covered.

Now you choose the colours to put back. I wanted a fairly vintage feel to this piece so I chose Dark  Brown and Black Acrylic Inks. I added the Dark Brown to the top edge with a large round brush and sprayed it with water to let it run down the canvas. It is also possible to use acrylic paints and colour sprays.

I also dry brushed some black acrylic ink round the edges of the canvas to frame it and over some of the texture to emphasise it. I smudged alot of this with my fingers for a softer look. I traced round the 'people' (Tim Holtz paper dolls) and filled in this shadow with a light layer of Black acrylic ink to give them more dimension and stuck them down with 3D foam.

Finally I added some text with 3D foam. It translates as 'Really lucky to have you'.

I hope you enjoyed that project. Please give it a go with whatever takes your interest and whatever colours you like. As another example, a few years ago I made a 30 x 30 cm canvas with old lego pieces which is electric blue and silver. You really can have great fun playing with different materials and colours.
Stay safe.
Karen

Wednesday, 3 July 2019

One layer scrapbooking page by Karen

This project started with a plain white page and my photo and I selected the materials I initially thought to use. As usual, that all goes out the window once I get started!


As I sprayed the paper with water and then sprinkled on Lime Green Brusho Crystals I swiped it across the page with a paper towel and then dabbed the Cobalt Blue to soften the colour too.

Liking the result so far, I diluted some Emerald Green and used the same paper towel to dab that over a compass shaped mask for a background detail.

To add more detail, I stenciled some Design-It paste in glossy white in three different places. I then used my favorite technique for stamping with Brushos: I rub the powder, in this case Emerald Green, dry and directly on to the stamp with my finger and then spritz the stamp with water. This allows repeated stamping and gives a soft watercolour effect. If the colour starts to fade, another spritz of water allows several more stampings.
(Quick note on this technique: The intensity of colour in Brushos can stain transparent stamps although they are not harmed by this. Also be careful to wash your stamps thoroughly after using this technique so that the colour doesn't transfer at a later date.) 

As I was then happy with the background, I added the photo, some stamping and a border to finish the page. Whilst I feel everyone has to scrapbook to their own style, I like to keep my scrapbooking pages flat as they fit easily in to an album and I also like to keep the photo as the focus without lots of distracting papers and embellishments. I deliberately used a large format for this page so I didn't feel it needed much else. I hope you like it: It brings back happy memories of a fabulous spot, Ballycotton in Ireland, that we found purely by chance.
Thanks for stopping by.
Karen

Monday, 17 June 2019

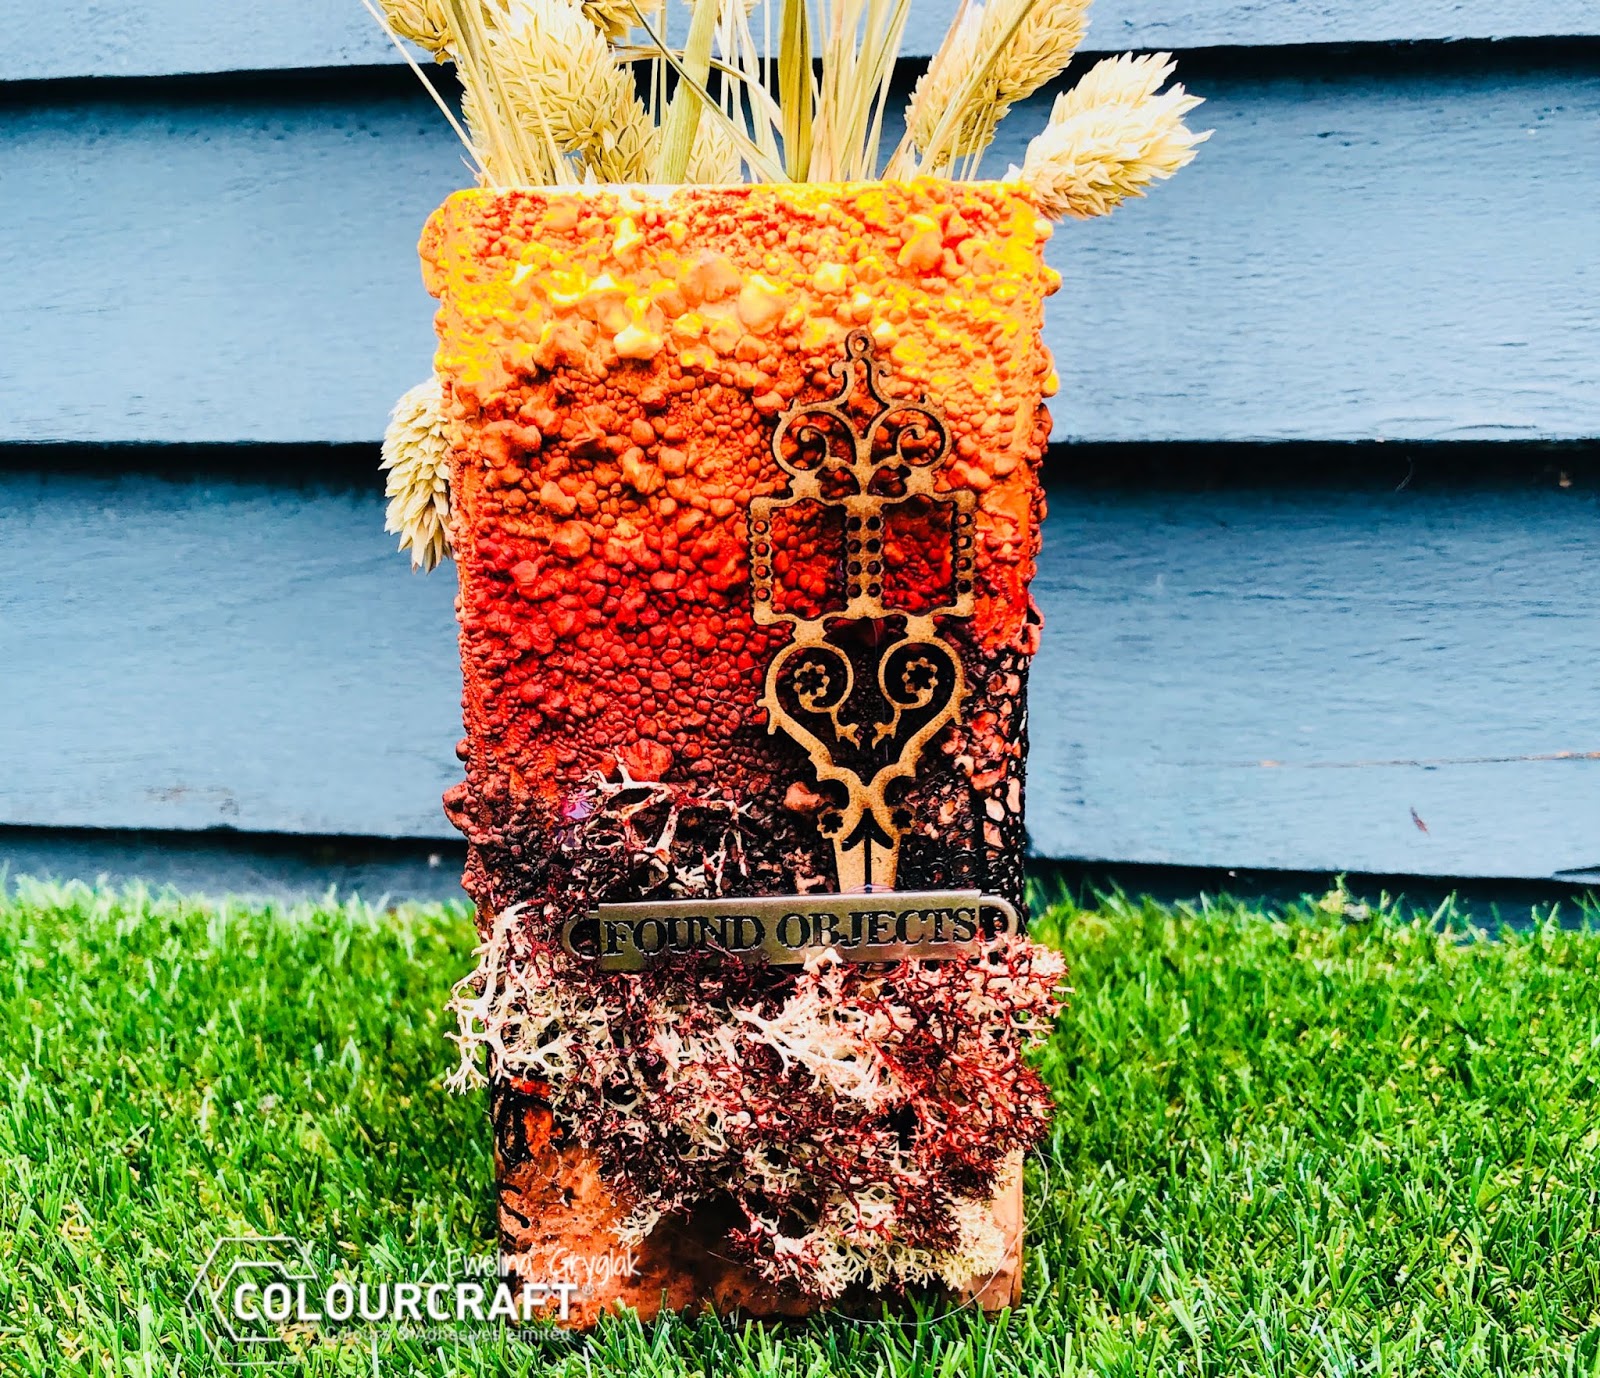
Rusty vase with ExpandIIT and Brusho

Hello, my crafty friends!!! 
As promised, I am back with another project using the ExpandIT paste.


This time I have altered a plain and boring white vase to make it look rusty, grungy and cool.


As prep, I used a silicone lace form (usually used to make decoration for cakes) and black DesignIT paste (aka Soft Form relief Paste); I gave it approx. 24hrs to dry. 
When ready, I took the lace out of the form and glued onto the vase.


Because I wanted the ExpandIT bubbled to be as irregular as possible, I used my hand to spread the paste above the lace rather than a palette knife.


As you can see, where there was more paste, the bubbles are bigger.
ExpandIT is such a cool medium to work with!!!


Next step was adding colour with Brusho; I chose Gamboge, Sandstone, Burnt Sienna and Terracotta.
I sprinkled it in lines to let the colours blend when misted with water.


Here you can see how the colour flows creating new shades.
I did that on each of the sides of the vase.


The last step was to add some embellishments to the front; the choice was some florist moss (I coloured it with whatever paint was still on the table - you know, make the best of every drop!); I also added a chipboard and a Tim Holtz metal badge.


As you can see, the process is quite simple but the result is absolutely freaking amazing!!!

See you next time.


Wednesday, 8 May 2019

Mixed Media Spring Tag by Karen

Spring is fully underway here and I am seeing birds nesting everywhere at the moment so that was my inspiration for today's project.

I started off with a wood support and applied transparent Design-It paste (previously Soft Form Paste) through a tree stencil. Now spot the 'deliberate' mistake! I forgot to mix in my brusho powder before applying the paste! Happy accident: Time to experiment by adding the powder on top and seeing how it would react. I helped it move a little by spraying water over the top and then left it to dry and for the paste to turn transparent. It resulted in a lovely charred bark effect which reminded me of pyrography: That could be handy for a later project.

While the paste was drying I applied Leaf Green and Light Brown Brusho Crystal Colours to one watercolour paper for the nest and mostly Cobalt Blue with a touch of Turquoise and Prussian blue to a smaller piece for the bird. I used plenty of water and tilted it back and forth to make the colour cover the paper and then left these to dry.

As I thought about the composition and decided to add some leaves in to the background, I coloured another small paper with Sea Green and Leaf Green Brusho Crystal Colours and added more Leaf Green and some Sunburst Yellow to one side of the larger paper. You can these below along with the texture and shine created by the Design-It paste.

Making sure to mix in the Light Brown Brusho Colour first, I continued the stencilling to the bottom of the tag and added paste across the reinforcer and round the edges.

I stamped and cut out my images using a text stamp for the nest. I repeated this to cut the strips of words to glue just by the edges in all directions like twigs protruding from the nest. You can see how this was done below.
After highlights were added with a white gel pen and an eye was created with a dot of dimensional enamel I think my birdie looks quite settled in her nest.

I hope you like this springtime creation. Thanks for stopping by.
Karen


Related Posts Plugin for WordPress, Blogger...