Showing posts with label wax resist sticks. Show all posts

Saturday, 9 May 2020

Make your own stencils for a Beautiful Brusho Garden

Hello Everyone!
Spring has sprung and the garden is getting out of control! One of the things I've been doing during these crazy times, is experimenting with journaling and online classes etc. One of the journal exercises I had a lot of fun with was by Karen Stamper. She did a lot of scribbling, painting, drawing- in a really freestyle form to make a garden drawing in black and white.
This is my version using hand made stencils and Brusho! And it is super colorful. Best part about it- you don't need to know how to draw at all!

First I decided to make some simple stencils. For this I needed a hot glue gun and glue sticks as well as freezer paper.
First I "drew" simple designs on the freezer paper with the glue gun. I peeled these off to act as one sort of stencil.  My second sort of stencil were free cut out of freezer paper.

 I gathered the rest of my materials...
I grabbed every shade of green Brusho I could find, a couple of Brusho SpraysSpray BottlesWax Resist Sticks, a fat candle, brushes, palette and a sponge.
First I drew on my paper with the wax resist sticks and candle- random scribble lines as well as repeating my leaf forms. Then I laid out my stencils.
Time for some super fun! I sprinkled and sprayed! My freezer paper stencils tended to curl up, so I flattened them out and held while spraying. Then let this dry.

I re-laid the freezer paper stencils in different parts of the piece and sponged on brusho that I had blended with water.
You also can rip out leaf shapes from other paper and sponge around them- or sponge inside a hole you ripped out in a leaf shape!
I had picked some leaves and laid them on a stamp pad- pushing down with a piece of paper on top and then stamping them into the painting.


After everything had dried, I went in with coloured pencils and added more details. It's hard to know when to stop!
Hope you enjoyed that and give it a try! Next time I'm going to try to get this effect onto fabric!

Monday, 3 February 2020

Happy New Dog Card with Brusho's and Wax Resist

Hello Colourcraft friends.  Gail here today.  I've made a card today for a friend of mine.  When her old dog died she said she couldn't handle a puppy at her age so she wasn't going to get another dog.  I couldn't see that lasting and I was right.  She decided to adopt an older dog and happy together they are.  So to celebrate new beginnings and new friends I've made her a card.


I used dies to emboss the background then used wax resist and Brusho's to colour it.  I went green because it reminds me of spring, new starts, fresh growth and happy sunny times.


I started by embossing my background panel with this large paw die and filled in some of the smaller spaces with the tiny heart die.  Then I got my Brusho Wax Resist Sticks.  I took the paper off one of the sticks and used the edge to rub over the embossed design.


I sprinkled Sea Green and Leaf Green Brusho's on the card and spritzed with water.


The wax covered paws are left whiter than the background.  


I added he paw panel to a dark green base card.  I stamped Paper Smooches Dog and sentiments using brown ink and coloured the dog with Sandstone Brusho powder in water.  To finish I added a few of the tiny hearts cut from red card.


Thanks for visiting today.  I hope you enjoyed my project.  Don't forget to share your makes using Colourcraft products in the Create with Colourcraft fb group. 

Monday, 24 June 2019

Simple Cards with Brushos and Brusho Accessories

Hello Colourcraft friends. Gail here today with some simple cards I made with the help of Brushos and some Brusho Accessories.  Did you know that in addition to making the lovely Brusho powders Colourcraft also have a load of additional products to make them even more fun!!  Today I used Brusho powders, the fabulous Brusho Travel Palette, useful even when at home!, Wax Resist Sticks and the Clear Spray Bottle
Take a look at my cards.


I'd like to introduce you to the Brusho Travel Palette, just in case you haven't come across it before.  12 airtight crystal clear pots in a tray.  It's my new best friend!!!  The little pots fit snugly in their wells and now I can take my 12 most favourite Brusho's out and about, or even just in my craft room without worrying about knocking them over or spilling them everywhere.  I also love the mixing areas and brush rests.  As I said, my new best friend. 


I started off with four of my favourite Brusho colours , Sunburst Lemon,  Leaf Green, Emerald Green and Turquoise.   I sprinkled a bit in the pots and then spritzed with water from the Clear Spray Bottle.  Love this too!!  It's a perfect size at 60ml, not too big, not too small, and the spray is fine, but controlled, so you don't end up spritzing the whole table!!  There is also a lock, which means it won't leak if you take it out and about.   


To make my card I embossed a piece of white card with this dandelion embossing folder.  I used the Wax Resist Stick and rubbed it over the embossed areas.  Then I just used a brush and applied my colours from the Brusho Travel Palette pots randomly over the embossed panel.
Loved it so much I made some more!!


OK, I admit I got a bit carried away and forgot to take more step by step pictures.  Top right is the dandelion folder one.  I also used another flower folder, one with arrows and a retro circle folder.  I love how the wax resist leaves the embossed areas white.


I cut the panels with a double stitch rectangle die and mounted on blue card bases.


I love the bright colours with the white embossed areas.  Can't decide whether to leave them as they are or add sentiments.  These were really quick and fun to make.


Thanks for dropping by.  I hope you have enjoyed my cards, and also seeing some of the accessory products, and I hope you get time to be crafty today.  Hugz

Wednesday, 28 November 2018

Wax Resist Canvas with Suzi

Good Day All, Today I'd like to share my latest creation using Brusho Crystal Colours, Wax Resist Crayons and DesignIT Soft Form Relief Paste. I decided to make a Mixed Media Canvas, which I plan on giving my Dad as a Christmas present.  Here's how I created it.

First of all I took a piece of Watercolour Card and a Piece of Cartridge Paper, a Texture Plate and Wax Resist Crayons.  I wasn't sure how well the Texture plate was going to work with the different thickness's of paper.

On the left is the Watercolour Card, and on the right is the Cartridge paper.  I used Brusho Crystal Colour in OST. Blue and Turquoise.

Here is the Cartridge paper with some Sea Green Brusho Crystal Colour added.

Here is the Watercolour Card with some Sea Green Brusho Crystal Colour added.

Next I took a 5 x 7 inch Canvas Board and collaged some of the Cartridge Paper and some piece of old road map. I added some White Gesso and left to dry.

Once dried I added some Shimmering Aquamarine DesignIT Soft Form Relief Paste through a stencil onto the Canvas.

The next step was for me to create my focal points.  I decided to stamps a couple of images onto the Watercolour card that I'd added the wax and Brusho's too.

I used a stamping platform to make sure I got a really good impression on the card.

Next I added some background stamping to my canvas before adding the images that I'd cut out.

To finish my canvas I added a little more background stamping, and inked the edges of the canvas.
Here's a couple of close ups;


I had lots of fun working on this canvas, I love the resist effect you get with the Wax Resist Crayons; and the DesignIT Soft Form Relief Paste is so thick and creamy, and has a lovely shimmer.

I hope you've found my post interesting. Thank you for taking the time to read it.
That's all from me for now
Bye for now
Suzi
xxx

Friday, 26 October 2018

Autumn Trees by Rebecca Yoxall


Hey everyone! 
Hope you are well on this fine Friday. I absolutely love the colour of Autumn trees and couldn't resist creating this Brusho painting.
Painting trees is so easy with Brusho, it lends itself perfectly for the wonderful copper, gold and scarlet leaf colours. 
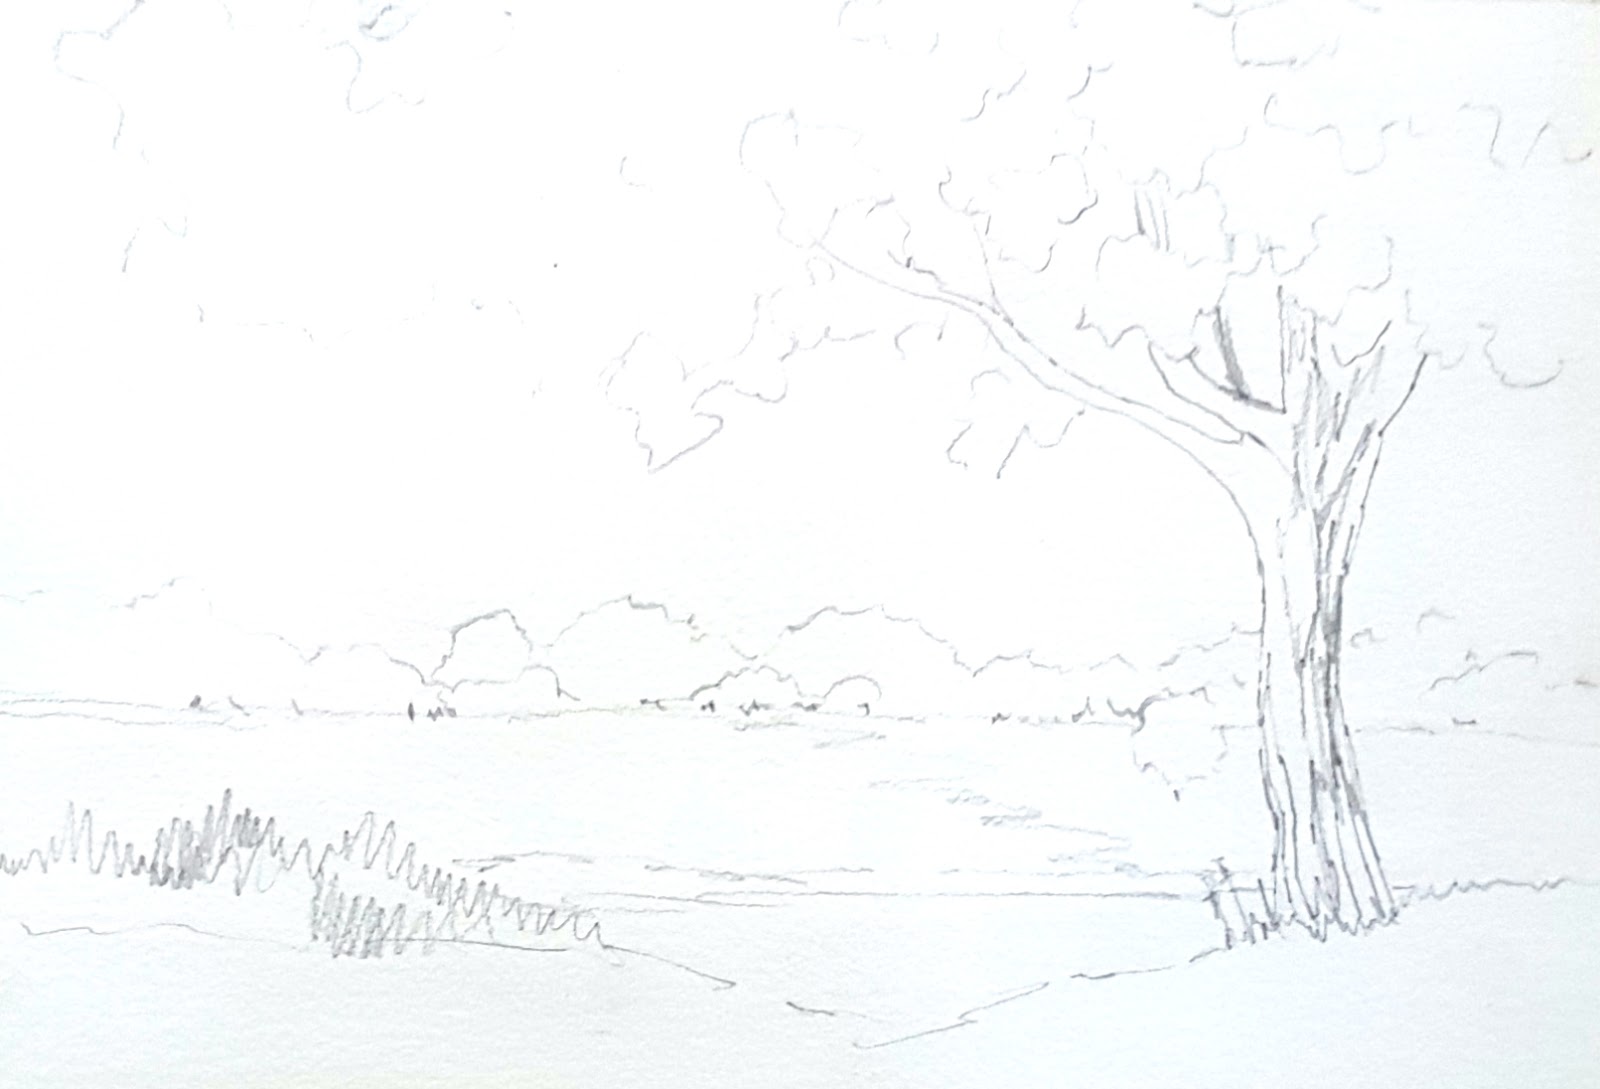
Using a sheet of good quality watercolour paper I drew out the trunk and main branches of the tree on the right hand side and suggested at distant trees, a field and water in the foreground.
I also wanted to make sure to keep lots of light through the foliage so decided to use wax resist. I drew with a wax stick in scribbles through the tree and added some grasses in the foreground as well as down the left hand side of the tree trunk. These will show up in later pictures.


Using a spray bottle I gently covered the foliage area of the tree with water and began sprinkling the Brusho directly on the paper. I used Yellow, Yellow Ochre, Orange, Crimson and Purple. 
Just a small amount of each colour so that plenty of white paper can still be seen. 


I then made a diluted mixture of Yellow Ochre and Light Brown Brusho in a palette and using a small round brush I painted in the distant trees and the field in a smooth wash.
I used even more water to paint in the foreground and then once again sprinkled Brusho directly onto the wet area. I used Light Brown and Dark Brown.


Once the paper was dry I used Cobolt Blue to paint in the sky and the small pond area.
Only a small amount of Brusho is needed to create a soft gentle shade of blue.


I also painted another layer in the foreground. It is here you can now see the drawn wax lines for grasses.  
I mixed up Dark Brown Brusho on my palette with a little crimson and coasted the trunk of the tree continuing up to develop some of the larger branches. Whilst this wash was still damp I painted a yellow on the left side of the trunk to further enhance the effect of light. 


Smaller branches were added using a fine brush or rigger brush, placing them in between areas of foliage to create the impression of intertwining around the leaves.


Using the small brush to suggest at more grasses and seed heads at the base of the tree and along the bank finishes the composition.

I hope you've enjoyed my post this time and maybe it has inspired you to create an Autumnal landscape of your own.
See you next time
Bec

Related Posts Plugin for WordPress, Blogger...