Showing posts with label spring. Show all posts

Wednesday, 4 March 2020

Be Brave and Bloom Card with Suzi


Good Day All, It's my pleasure to share my latest creation with you all today; I've created a fun card for you all today showcasing Brusho Crystal Colour Powders, Acrylic Wax and Wax Sticks.

Our theme this month is 'Spring or Easter' and I'm celebrating Spring with my project today.  I've used some lovely stamps from Crafty Roo Designs to help create my Spring time scene;

Here's how I created my project;

Firstly I started off by creating my background papers.  I took a sheet of paper and sprinkled on Turquoise Brusho Crystal Colour Powder and sprayed with water, I dabbed off the excess water and left it to dry.  For my second paper I used a Grass Texture Plate along with the Wax Sticks placing my paper over the texture plate and rubbing over with the Wax Stick; I then sprinkled on some Lime Green Brusho Crystal Colour Powder.  Once that was dry I mixed up some Turquoise Brusho Crystal Colour Powder with water and dabbed my paper into it to add a sky at the top.


I trimmed the Turquoise paper down to fit my card blank ( an A4 sheet of white card folded in half) and tore the Green and Turquoise paper on both sides before adhering to the Turquoise paper.


It was then time to start creating my focal point. For this I used the Bulb Stamp and Beauty always Blooms insert stamp from Crafty Roo Designs.  I stamped these onto white card, I stamped two, so I would have a choice once coloured.  I painted the flowers with Brusho Crystal Colours and once dry added a layer of Acrylic Wax over the flowers and a few areas I wanted highlights to show on my bulbs.


I then took Turquoise and Lime Green Brusho Crystal Colours and sprinkled them over the Bulbs and activated with water.

I left these to dry and then added a little Pearl SprinkleIT powder to the Blubs.

At this point I decided to add some more stamping to my background papers, using the Be Brave Enough to Bloom stamp set from Crafty Roo Designs


To colour the flowers on the background paper I mixed Orange and Crimson Brusho Crystal Colour Powders with some of the Acrylic Wax to create a paint.  I used Acrylic Wax rather than water as I would be going over areas of Wax and Brusho Crystal Colour Powders already on the paper.  The Wax on the paper would resist the colours I was adding and my flowers would be patchy, by using the Acrylic Wax there is no resistance so I get full coloured flowers. I used a Bamboo Pen to add my coloured Wax to my project.


I added layer of the coloured wax over the flowers on my bulb to strengthen the colours. At this point I decide I wanted to add some green to the stems and leaves, so I mixed up some Leaf Green Brusho Crystal Powder with the Acrylic Wax.

Here's the finished Bulb;

To finish my background I added some dots of the Orange and Crimson Wax into the background to represent flowers in the background.  I added some Leaf Green Wax to the stamped flowers on the stems and leaves, I also added some to the grassline at the bottom of the flowers for extra shading, to blend this I used my finger.
 
I added a little red netting and some staples just for a extra bit of texture, I then added my background to my card blank, and finally I added my Bulb using some foam pads for dimension.


That's my project for this week, I hope you've enjoyed seeing how I created it. If you've not got any of the Acrylic Wax then you really should add some to you crafty stash, it's lots of fun to work with, very versatile, and lets you create layers of Brusho colour without the colours blending. 
I had lots of fun creating this project, it's so nice to be welcoming Spring, lovely to see the trees getting their new leaves and flowers starting to bloom.

Thank You for visiting with us today, 
Bye for now
Suzi
xxx

Monday, 10 February 2020

My birdhouse is cooler than yours!

It's been very cold and windy and rainy in her for the past week or so. And since it doesn't seem like I will be getting any snow this year ... I miss it so much! Like, proper snow... 20cm deep, fluffy, white heaven... that kind of thing... anyway... where was i? yes, so since it seems like I can only dream about the wite fluffy stuff, I am looking forward to spring. And with spring come birds and baby birds... and baby birds need homes.


 Do you see my logic? 
Birdhouse was the logical (...ish) next project on my list...


I didn't paint it with any base because I wanted the paint to soak into the wood and for the natural wooden pattern to be visible. Eco Acrylic paints are perfect for that!


I painted the whole birdhouse using two colours - Viridian and Turquoise.
I did two layers just to make sure the colour is vibrant despite having been soaked in by the unprimed wood.


Now to the fun part!
I mixed white with a bit of black paint to create very light grey and stamped the Peace Sign ArtFoamies all over (apart from the front). This is my first layer.


The second layer was alse created by using ArtFoamies - this time I opted for Magenta and Purple Eco Acrylics and Stars Foamies.


I made sure that I left the paint to dry thoroughly and sprayed it with varnish to prep for the weather conditions once the birdhouse is nailed to the tree in my garden.


And... yeah, my birdhouse is sure much cooler than yours! hahaha

Have a great week!


Saturday, 8 February 2020

A cheery touch of Spring


A fun and cheery card using a technique that you could easily use in a journal or on a canvas. The background has depth and texture.

Firstly I took a piece of 300gsm cardstock and sprayed it generously with Spray Starch.  I then sprinkled a few grains of lemon and orange brushos over the starch and card. When I open a new pot of brushos I poke a small hole in the top and keep a pushpin in it.  In this way, only a few grains of brusho powder (which is all that is needed) come out at a time.


I took a piece of clingfilm and scrunched it up and placed it over the damp brusho and starch mixture.    It is important to ensure that the clingfilm and the wrinkles within it are pressed down firmly as this is what will create the texture in the finished piece.

Leave it to dry for around 30 mins.


Remove the clingfilm and note the texture created.  I also created a couple of samples using turquoise and yellow brusho powder.  I often create several samples at once, given the time they take to dry.


I then took a stencil and some eco acrylic paint in yellow deep hue and, using a sponge, dabbed it through the flower stencil.  It is important not to use too much paint otherwise it will bleed through the stencil and create splodges.


Using a fan brush, I then created black splatters over the card. When splattering, I mix water with the paint to give a smooth flowing mixture.


I used the word create because I often think of Spring time as a time for new creations and a time to birth new ideas.

Happy days!


Saturday, 23 February 2019

Spring Home Decor : Birds Nest

Hi Everyone,

Sarah here with you today on the blog and I have a super quick and easy easter/springtime project for you!.


Step 1

Take a paper plant pot and apply a layer of white acrylic paint over the surface, a bit like dry brushing, so that you don't get full coverage, as we are going for a shabby rustic look


Step 2

Dig around in your stash for some lace, trims and fibres, I layered 3 together to make the easter nest look pretty.


Step 3

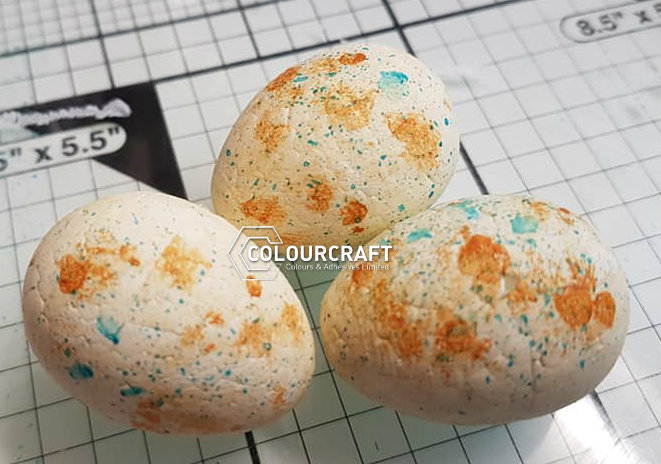
Paint your polystyrene eggs with a layer of gesso, then paint with a layer of titanium buff, and speckle them with burnt sienna and turquoise.


Step 4

I scrunched up some raffia into the pot and arranged my speckled eggs inside to complete the project


I hope you enjoyed today's project, this took me less than an hour to complete and would make a great addition to your spring/easter themed home décor

See you all next month with more fun projects

Thanks for visiting today

Sarah


Saturday, 16 February 2019

Spring Mini Quilt with Paste Paper effects

For quite some time I've been wanting to find a way to imitate traditional paste paper effects onto fabric. Well this week I got ahold of some Gelli printing tools and inspiration ran rampant!

First I got out my opaque fabric paints and one of my Gelli plates. I cut a bunch of small pieces of calico fabric (muslin) and got started.


I added some color to the surface of the Gelli plate, rolled it out with a rubber roller, and then used one of the Gelli printing tools to mark a design.


I then placed a piece of fabric over the top and gently patted with my hand so the color transferred to the surface of the fabric. You can also use a clean roller on the back of the fabric. The above picture is the result!

I then continued to play with color, tools, overprinting and got a nice batch of very pretty fabrics!!
I decided to use most of them to make a mini quilt.

First I drew a simple flower design and traced it onto 4 pieces of fusible web. I fused those to the backs of 4 of my fabric pieces and cut out and swapped around the fabrics.
I then fused these onto another piece of fabric.
I took more of my fabric pieces, paired them up, cut them into strips and wove them into new blocks.

Finally I stamped an image that I got from Rubber Dance Art Stamps and made that my central block. I used Opaque Navy fabric paint dabbed on with a foam brush.

So then I set all the blocks together into a mini quilt! Now I just need to sew it all.
Happy Spring! See you next month for some Easter inspired projects.


Related Posts Plugin for WordPress, Blogger...