Showing posts with label sponge daubers. Show all posts

Monday, 28 January 2019

Upcycling my storage - Ewelina

Despite being an extremely organised person, my craft room is always extremely messy.
I blame it on the fact that I like seeing what I have so that I can grab it when I'm in the zone rather than having to look for it... 
I didn't want to show the extent of my messy studio to the wide public so you get to see only one of the shelves - on this one, I store some of the bases for my projects (small canvas, boards, wood slices, disassembled albums and other bits and pieces).


Here is the before and after ^^^ 


I started by grabbing one of my spare Dröna boxes (yes, I have a stash of those too!) and Tattered Angels Mixed Media Origins paper called Masquerade Ball (I love those dressed up ladies!!!).
To top it up - both Opaque and Metallic Fabric Paints ... and I was ready to start,


I cut out the ladies and glued them onto the box.
CONFESSION: It wasn't the best decision and proved slightly messy afterwards. Don't make the same mistake!!! You should do your background first and then glue the ladies onto it.


I chose of my Artistcellar stencils and Blue Metallic Fabric paint to do the background.
I used washi tape to keep the stencil in place while dabbing on the paint.


Using a range of greens and pinks/purples I coloured the ladies - the Mixed Media Origins paper is a little bit like canvas so fabric paints are perfect for it! 


Once everything is coloured and dry, you should assemble the pieces together using fabric glue (I used spray Crafter's Companion Stick'n' Stay).


I think it looks pretty cool, don't you?


Monday, 16 July 2018

Printing on Canvas Shopper Bag with Ewelina


Hey everyone! The heat-wave continues and my crafting mojo has most probably left to the beach as I haven't made it into my studio for at least a week now... it's simply too hot.


But heat or not, life goes on and I do need to crack on with my life, part of which is going shopping - I hate it with a passion!!! Since I am not a fan of purchasing my groceries online, I have to make the dreaded trip to a supermarket every week to stock up on the basics. To make it slightly more pleasant, I take my own colourful bags with me - it also means that I am more environmentally friendly by not buying any of the plastic carriers that supermarkets offer.


Amongst my stash of Canvas Corp black canvas goodies, I found this Canvas Shopper Bag
which was perfect for both - adding some funky colours to it and using for carrying  my fresh veggies from the market.


All I needed to make the first part happen was some Metallic Fabric Paints and a couple of large stencils (I opted for mandala designs as they are pretty in at the moment and look cool with ombre colouring).


To make sure the stencil stayed in place, I used large paper clips to pin it down.


After deciding on the colours I wanted to use (pink, purple, green and blue), I grabbed a sponge dauber and started playing.


Changing the colours as I went, I made sure to use a clean part of the sponge for each new colour to minimise the contamination and keep the colours vibrant.


Then the second mandala - I used the same colours but in different order.


And the third one - again, same colours but different order.


Once my mandalas were all stencilled on and dried, I decided to add a bit more detail using a different stencil and Metallic Gold Fabric Paint. To make it look like it was part of the original design, I overlaid it slightly with the original pattern.


As you can see, the two stencils worked pretty well together.


Now my shopper bag is ready for being filled with some market goodies... but I think I'll wait for the weather to cool down a bit before I brave a visit to the local market.

See you next time!


Saturday, 16 June 2018

Fabric Painted Photo Album

Hi Everyone!

Sarah here with you today on the blog, and I have a fun photo album project for you today using lots of lovely Colourcraft products.

For my project I used fabric paints for the very first time and if I am being honest, I have had them for over a year and was terrified to use them :) ... however, after using them on this project, I am hooked, they are absolutely fabulous to work with and you can expect more fabric and fabric paint related projects in the coming year!


This blog post is going to be a long one with lots of pictures along the way, so grab a cuppa and enjoy ...

Step 1
I picked a cotton blend fabric and some matt board (same stuff they use to frame pictures) I like to use this when I make books, it is sturdy and great to work with.  The finished book is 5" x 5"

Step 2

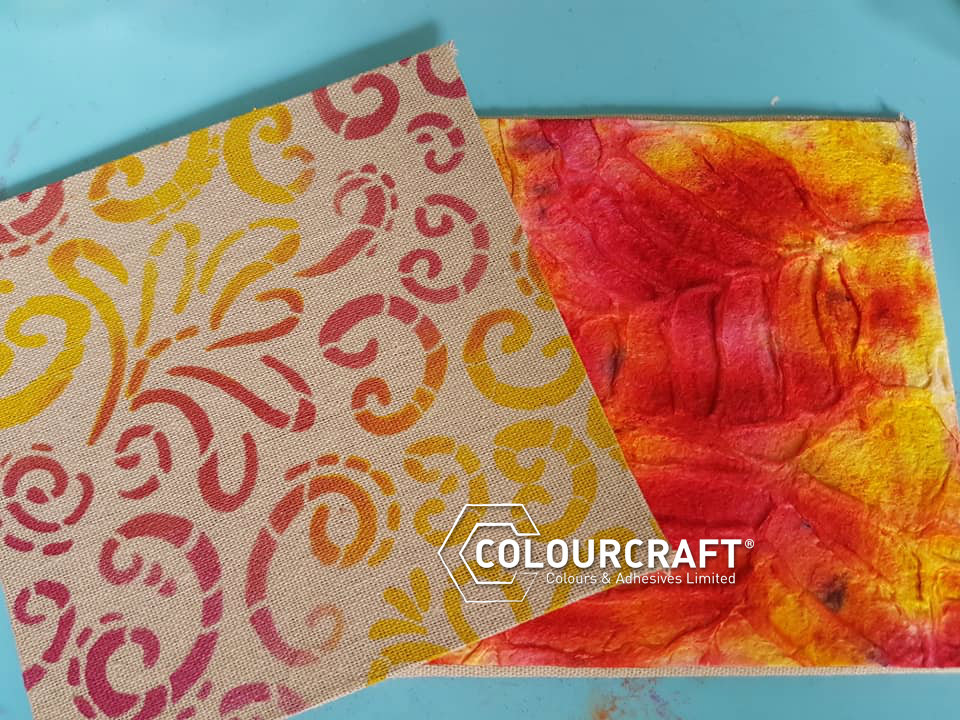
Remember the Kozo paper from my last blog post, I decided to use up the piece I had left which was just the right size for the inside covers for this book.


Step 3

I then picked out a couple of colours of fabric paint, sponge daubers and my curliecue stencil girl stencil from the blog hop last year, I love this stencil so much it is so pretty..


Step 4

I saturated the kozo paper with water and sprinkled two colours of Brusho over the top and allowed to soak into the paper, I also spritzed with water to help spread the crystal colours


Step 5

I hung my kozo out to dry in the sun


Step 6

Time to stencil my book covers, I applied a small amount of fabric paint to my sponge dauber and pounced on my mat to work into the sponge, then gently applied through the stencil in a circular motion to build up the colour without pressing down hard, as this would cause the paint to bleed under the stencil.


Step 7

Carefully lift off the stencil and there you have a lovely fabric painted front cover! .. I allowed my fabric to dry naturally, but if you are short of time a heat tool would be just as good to dry your paint, which doesn't take long.


Step 8

Once both your book cover and kozo paper are dry it is time to assemble the book


Step 9

I applied some collal fabric glue to fix my kozo paper (inside cover) to my main book page


Step 10

I used my We R Memory Keepers Cinch binding machine to form my photo album, and I used kraft cardstock for my inside book pages these were cut to 4.75" x 4.75"


Step 12

Time to embellish the front of the book, I wanted to keep it simple so as not to detract from the lovely pattern of the stencil and the blending of the fabric paints, so picked some lovely pink buttons and attached to the edge of the book.


I hope you enjoyed todays project and have a lovely weekend.. I shall see you in a couple of weeks time with another fun project for Colourcraft :)

Sarah x


Related Posts Plugin for WordPress, Blogger...