Showing posts with label brusho on fabric. Show all posts

Friday, 29 November 2019

Forest Layers

This week I've been having a play, building up layers on a cotton fabric base, although you could use a base of heavy paper instead.
The process used some yarns, screen printing, a couple of stencils and couching stitching. Oh and I thought the forest needed some sparkle too!

Here is my finished picture, but you could use the same techniques and products and come up with your own unique picture. 


Screen printing can be messy so protect your surface. I like to use several layers of newspaper over a plastic sheet which gives a little give which helps the printing.

I used some yarn and some net from lemons to add design. Having taped them across the fabric I mixed some adva print pearl binder and  Adva-Print concentrated fabric colours brown and white. I then placed a screen printing screen over the fabric and a dribbled the mixed colour across the top area. 


Tips for screen printing:

Holding the screen firmly down with one hand, place the squeegee  (or an old plastic credit card) above the ink and, applying some pressure, pull it down the screen, taking the ink with it pull at a 45ยบ angle  Repeat, and then put the squeegee to one side, being careful not to drip excess ink.
 Holding the fabric down with one hand, lift the screen up from the bottom edge and then away.
You can mix the Adva print colours to get the shade you want (I mixed a green to use next).


 When you have finished wash the screen with cold water. Scrub it lightly with a sponge or nylon washing-up brush to make sure you get all the ink out.
 Leave the screen to air-dry before printing again.


Once the screen printing was dry, I decided I wanted to have a little sky showing through the forest tree design. I mixed a little Brusho ost. blue with water and dabbed it onto the area I thought needed to be the sky. I added a little SprinkleIT   Iridescent Violet to the wet blue to give the effect of light sparkling through the trees.


I then started to build up the layers of the forest.
In my palette, I mixed a little Brusho moss green and a little Brusho thickener with some water to form a paste. 

I then dabbed this over some of the TCW "Jungle Vines" mylar stencil  Colourcraft do stock this so give them a phone call (01142421431) if you would like one


When dry, this is the picture so far:


Wanting to add more layers and create 3D, I put the fabric in an embroidery hoop and couched some yarn down.


I stood back to view the composition and was not entirely happy. I decided it needed some sunlight shining through part of the trees onto the forest floor.
 I mixed some thickened Brusho Yellow Ochre and dabbed it through the TCW "Burst" mylar stencil. This is the same as I used for the bag design a couple of weeks ago.
I added some 
SprinkleIT  Iridescent Gold to the wet yellow paint before I removed the stencil.


When dry, I ironed the design on the reverse to remove any creases. I did this on a makeshift "ironing surface" consisting of folded newspapers covered in foil so as to not get any paint or sparkle on my ironing board!

I then tried a mount on the design to check I was happy with the design. I decided to stop there.


What do you think?


Saturday, 24 November 2018

Creating Depth with Brushos on Fusible Web


Greetings everyone! November is winding up and I thought I would follow our Design Team's theme today "Layers" by showing you a super easy way to add extra depth to your art quilt projects using Brusho on fusible web!


I started by cutting out a couple of pieces of a fusible web. I sprinkled on some colors of Brusho powders (violet, purple, prussian blue, ost. blue and lime green), and then spritzed with quite a lot of water.

I just love how the paper underneath scrunches up  making the Brushos blend and pool! 
While these dried, I got out some fabric which I had ice dyed this summer with Colourcraft Procion Dyes. It doesn't have to be summer to ice dye! Actually, if you live somewhere where you already have snow, you can use the same technique that's in the blog- just leave it longer! 

When my they had dried, I peeled off the fusible off of the backing paper . The backing paper is great for collages! Here you can see the backing paper and the peeled off fusible. Don't worry! There is plenty of color left on the fusible to get a cool effect!

Then it's just a matter of placing the fusible on top of your fabric pieces and pressing into place- make sure to use parchment paper to protect your iron though! I've taken some before and after pressing pictures, the colors get brighter and stronger after you press them- that's because the fusible looks white, but turns clear after pressing!


You can see how it adds depth to my original fabric! I decided to leave the first one as it is at the moment- I think i will be a great base to an embroidered landscape, but I wanted to do more to the second, so I got out a stencil I found at Panduro and taped it onto my background. I put some navy blue and turquoise opaque fabric paint onto a palette and used a stencil brush to dot on the paint!

When I had finished painting…
I removed the tape and pulled the stencil off to reveal…
Voila! I think this will be quite fun to make more of and I love all the colors and blending that I got with these techniques.
See you next time!


Monday, 19 November 2018

Christmas canvas banner with Ewelina

It's mid-November so call me crazy but I have already started working on my Christmas decorations!
Don't get me wrong, I am not displaying them anywhere yet - they're all going to nicely wait in a box in my studio until the first week December. I am not that crazy!


My first make is a canvas banner from Canvas Corp which I altered to hang on my front door when the time comes.


I started by priming the banner in Procion fixer, which comes as part of the Dytek Procion Dye Complete Starter Kit and will create a base for the Brusho sprays. I have done it last week so that it could air dry thoroughly. 
Once on my working table again, I sprayed it with Scarlet and Sea Green Brusho Sprays and left to dry.


Next, I used gold and bronze Metallic Fabric Paints to stencil on a Christmassy design.


While the paint was still wet, I generously sprinkled Gold and Bronze SprinkleIT to add texture to the stencil.


I purposefully made it uneven and added more SprinkleIt is some areas than others - I really like the distressed, grungy look.


What do you think?

Get ready for some more Christmas things when I'm back in two weeks!


Friday, 12 October 2018

Mug Rug with Fabric Transfer and Brushos

Leaves are turning, there is a chill in the air, what can be better than a nice warm beverage and a sweet treat?
Today I'm going to show you how to make a cute little mug rug using  image transfer as well as Brushos with fabric medium,  all on fabric which I had dyed with shibori techniques earlier this year!

First I started with some fabric which I had dyed earlier- if you want to know how, just check out this blog entry : Shibori Dying techniques.

I found a copywrite free image of a maple leaf and printed it out on my laser printer. Your image will be the REVERSE of your picture, so bear that in mind if you use text.
I cut out my leaf around the outline, covered it with a decent layer of image transfer medium, and put it face down onto my fabric.
I left this to try overnight. The next day I sprayed the back of the leaf with water and gently scraped away the paper with my fingernail. Basically you want to scrape away the paper but NOT the image!Gently! Spray more water if it starts to dry out.
Let your image dry. It should look something like this…
If you like this look- you can leave it! I would paint over the image with fabric medium, let it dry and sew up into your mug rug! 
I wanted to add some of the beautiful Autumn colors that I'm seeing! So I painted my leaf with fabric medium and sprinkled a few shades of Brushos on it. 
I sprayed with water to activate the Brushos and get beautiful colors and blending!


When my leaf was dry, I coated it with another layer of fabric medium. I then cut out my leaf and appliqued it onto another piece of hand dyed fabric, added batting and backing and quilted it!


I'm quite pleased with how it turned out! 
Have fun and see you next time!


Saturday, 6 October 2018

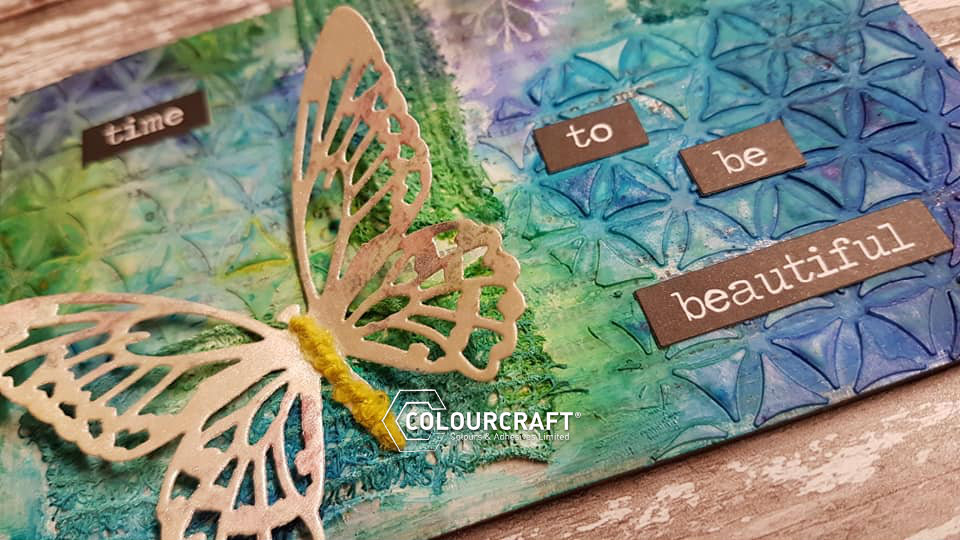
Time to be Beautiful

Hello Everyone!

Happy October to you all... our theme here on the blog for October is "chill in the air" and there certainly is quite a change happening already, we have had a couple of frosty mornings already!

So with this in mind, I chose cool blues/green and violet for my project today which is an altered wooden postcard.


Step 1

take some book pages and a wooden postcard and work out placement for the torn book pages, then adhere to the postcard with matte medium.


Step 2

Blend in the edges of the book pages with some white acrylic paint


Step 3

Add some old fabric bandage pieces to the postcard and adhere with matte medium and dry with a heat tool.   Apply soft form relief paste through a stencil and heat set.


Step 4

Apply some water to the surface of the postcard and sprinkle Brusho, I chose Turquoise, Lime Green and Violet, heat dry in between spraying and sprinkling until you get a background you are happy with.


Step 6

Take butterfly and press into versamark ink then dust with pearl SprinkleIT and adhere to postcard


Step 7

I took a small branch stamp and tapped this on versamark ink and stamped direct onto the postcard, then dusted over some SprinkleIT to tie the piece back to the butterfly.


Adhere the butterfly and text stickers to the project and we are done


you can pop this in an envelope and send through the mail as the butterfly will lay flat and there is very little bulk to it.

Thanks for joining us today on the blog and have a great weekend

Sarah x


Warning: getimagesize(include/images/thumbnails/125/36618): failed to open stream: No such file or directory in /var/www/vhosts/smouwen.nl/thumblinky.nl/preview.php on line 85
Related Posts Plugin for WordPress, Blogger...