Showing posts with label ATC. Show all posts

Wednesday, 6 March 2019

Acrylic Ink ATCs with Suzi

Good Day All, Today I'd like to share with you a set of ATCs (Artist Trading Cards) I've created using Acrylic Inks, Stamps and a Bamboo Pen.  

Here's how I created my project;

First of all I started adding Acrylic Ink to Mixed Media Paper with a Brush;
Here's the first few colours I added, If you add colours next to each other whilst wet they will blend, or you can leave each colour to dry before adding a different colour, then you get a lovely layered effect.

I then added some more layers of colour

I then trimmed the paper down, cutting out 4 ATC sized pieces for this project.
I then took some Clear Stamps from my stash, and using the Black Acrylic Ink and a piece of sponge, I stamped some images onto my backgrounds.
I then added a little of the Black Acrylic Ink onto my acrylic block and used it to add a few splodges to my ATC.

Here's my ATCs with the images stamped on them, and the additional splodges of ink

I then added some Ultramarine Acrylic Ink to the background of the ATCs and Scarlet and Yellow Acrylic Ink to the Flowers.  I then decided to add a couple more flowers to one of the ATCs so I stamped them onto some card, coloured with Scarlet and Yellow Acrylic Ink, left to dry, and then added some details using Black Acrylic Ink and a Bamboo Pen.
I then added the extra flowers to the ATC, and some more details to all the ATCs using the Black Acrylic Ink and Bamboo Pen.
I then added some highlights with White Acrylic Paint.
At this point I decided the ATCs were pretty much finished, although I didn't like the writing I'd added.  So I added some White Acrylic Paint to the Balloon ATC to cover the writing, and represent clouds, once dry I added some Ultramarine and Emerald Green Acrylic Ink.

I'm quite pleased with how the Balloon ATC turned out, the Acrylic Ink over the Acrylic Paint gives a really interesting texture, so I'll be playing with that technique more in the future.

Here's all the ATCs once finished;
I loved working with the Acrylic Inks, you can get some lovely layering effects, and the colours dry really bright and vibrant.  It's the first time I've used a Bamboo Pen, and I have to say it's a really wonderful tool to use, feels really nice to use, and gives lovely crisp lines.

I hope you've enjoyed ready about my project as much as I enjoyed creating it, I'll definitely be playing more with Acrylic Inks in the future, and hope I've inspired you to give them a go.

That's all from me for today
Bye for now
Suzi
xxx

Saturday, 26 January 2019

Valentine ATCoins

Hi Everyone,

Hope you are all having a great start to your weekend!

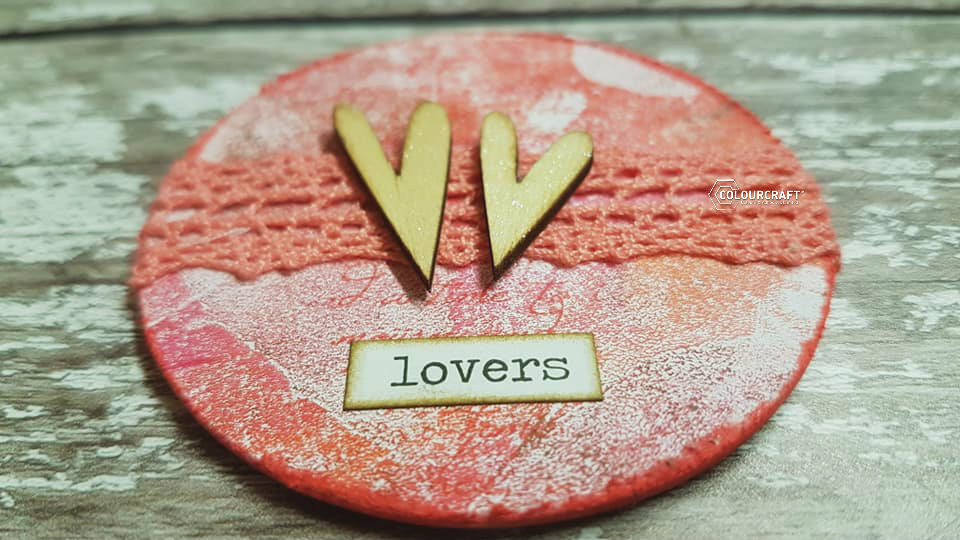
My project today is Artist Trading Coins.   I used some jelly plate background papers made using Colourcraft Acrylic ink, and I also used some lutradur and Acrylic Spray mists.


Step 1

Take a blank ATCoin and your Gelli plate printed background papers and using some tombow stick adhesive glue your disc to your paper.


Step 2

I took a script stamp and some Neon Red Hero Arts Ink Cube and stamped over the top of the Gelli printed paper.


Using the same ink cube, I ran this around the outside edge of each ATCoin.


Step 4

Take some lutradur and skim a very thin layer of expandit over the top and dry with a heat tool until it expands and dries, once dry spray with brusho acrylic spray mists, dry with your heat tool and die cut a heart shape.


Step 5

Time to embellish!.. I used some cotton ribbon, pink lace trim, wooden hearts, epoxy hearts


I hope you enjoyed todays project and make some of your own ATCoins, they are fun to make

Have a great weekend and see you all again soon

Sarah x


Friday, 23 March 2018

Brushos on Photopaper - Video Tutorial by Susanne

Hi there!

Today I tried something new with my Brushos. I used them on Photopaper and was really surprised about the result. They work amazing on this paper and a bonus is,that they become permanent! You can go on top with other mediums without a reactivation of the Brushos. I created these two artist trading cards (ATC) with the background. An ATC is a artistic card with a size of 2.5 " x 3.5".


I recorded the process and have a tutorial for these ATCs for you:


I hope you've enjoyed the video!
Thank you for stopping by today!Have a wonderful weekend.
xx Susanne.

Supplies:

Wednesday, 24 January 2018

Love Is In The Air Mixed Media ATC Set By Katie Lamb

Hi all

Today i have a set of Artist trading cards to share using Brusho Powders.


I started off by coating the ATC blanks with white gesso. I then mixed the Brusho Crystal Powders in water and painted them on with a paint brush. I added more water to spread the colour a bit more.


For this one i used a watercolour effect and then i used a texture stamp on the background. The hearts are created by painting Rose Red Brusho Powder onto white card, allowing it to dry and then using die cuts to cut out the hearts.


I  used the Brusho Crystal powders like a water colour paint and painted a section of the card. I then used texture stamps on the background and then added the die cut hearts.


I painted a layer of crackle paint onto the base and then soaked it with Brusho Crystal Powders. I then stamped texture stamps onto the base and added the hearts and small words. I used a strong adhesive to add micr beads around the larger heart and edges.


Thank you for visiting.

Friday, 17 November 2017

Mixed Media Artist Trading Cards by Susanne

Hi there!

I am sharing two watercolour artist trading cards today. I love to use Brushos to make myself a watercolour palette. The benefits of Brusho colours are, that they are very transparent, which allows you to layer and blend them in beautiful ways.


I start by painting some simple butterfly shapes onto watercolour paper. I add patterns to the wings by using different techniques: I play with wet in wet and also wet on dry watercolours. (Brusho Colours: Moss Green, Yellow, Gamboge, Turquoise, Rose Red, Purple)


Once the butterflies are completely dry I add the body and some details with a fine brush and black Brusho colour.
I also sprinkl some colour splatters on top. This creates dynamic and depth.


While my butterflies are drying, I cut two pieces of watercolour paper to the size of 2.5" by 3.5". This is the size an Artist Trading Card must have. I create a Brusho background by sprinkling the powders onto the wet paper and blending them with a brush. Once this is dry I paint some leave shapes.
(Brusho Colours: Ost. Blue, Vermillion, Prussian Blue, Gamboge)
Finally I sprinkle Aztec Gold and White acrylic paint on top. (Thin these paints down with a little bit of water, so you can easily create splatters)


I pick two of the butterflies, cut them out and adhere them to the cards. I finish them up with a Tim Holtz Idealogy sticker.


Tip!!! Once you've your butterflies painted, scan them to your computer. You can print them later and use them on other projects, too! Sometimes you get really nice effects when you play with a photo software and change the colour settings.


Have a wonderful weekend!
Thank you for stopping by today.
xx Susanne.

Supplies:
Related Posts Plugin for WordPress, Blogger...