Showing posts with label garden. Show all posts

Saturday, 23 May 2020

Layered Garden with Transfer Colours

This week the Fabulous Clare did some tips, tricks and demos with Colourcraft's transfer paints in a live broadcast on Facebook! You can watch it HERE

Anyway, I also love playing around with Transfer paints. This week I thought I would take inspiration from my last blog post, this time doing similar techniques but on fabric!

I decided to use transfer paints and crayons- that way I could do my images on paper first and then layer them onto fabric when I transfer them with an iron.
Transfer colours are paints, crayons and pencils that you draw and paint on paper with (normal copy paper is best really) and then transfer over to fabric with polyester content (or that has been treated with transfix) by using heat. I started by decorating my paper- I used an old candle and Colourcraft resist sticks to scribble on paper- even over a rubbing plate!! I painted around some hot glue stencils I made for my last blog. I used some makeup sponges to stamp through a paper stencil I made and around actual leaves I had picked. 


These are the finished papers I made:


The wax resists the paint, I also flicked some droplets onto some of my pieces. 
I then played around with using pieces I had cut out of plain paper as masks and ironing the different paintings in layers onto a glittery satin. 
Leaves laid on the fabric...

This is with the "background" painting ironed over the top.

This one is with several of the paintings ironed on top of each other. 

This one is my favorite result! The paper paintings often can be used more than one time- giving a lot of depth and texture to a piece.

Here was the one I had done on paper with Brushos:
I'm quite pleased that I managed to imitate the effect! Of course, I had done the one on fabric with mostly shades of grey, but you can see the similarities.
Here are some more links to blog posts I've done with transfer paints:

See you next time!!!


Saturday, 9 May 2020

Make your own stencils for a Beautiful Brusho Garden

Hello Everyone!
Spring has sprung and the garden is getting out of control! One of the things I've been doing during these crazy times, is experimenting with journaling and online classes etc. One of the journal exercises I had a lot of fun with was by Karen Stamper. She did a lot of scribbling, painting, drawing- in a really freestyle form to make a garden drawing in black and white.
This is my version using hand made stencils and Brusho! And it is super colorful. Best part about it- you don't need to know how to draw at all!

First I decided to make some simple stencils. For this I needed a hot glue gun and glue sticks as well as freezer paper.
First I "drew" simple designs on the freezer paper with the glue gun. I peeled these off to act as one sort of stencil.  My second sort of stencil were free cut out of freezer paper.

 I gathered the rest of my materials...
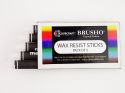
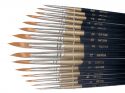
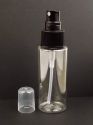
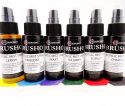
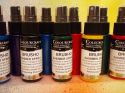
I grabbed every shade of green Brusho I could find, a couple of Brusho SpraysSpray BottlesWax Resist Sticks, a fat candle, brushes, palette and a sponge.
First I drew on my paper with the wax resist sticks and candle- random scribble lines as well as repeating my leaf forms. Then I laid out my stencils.
Time for some super fun! I sprinkled and sprayed! My freezer paper stencils tended to curl up, so I flattened them out and held while spraying. Then let this dry.

I re-laid the freezer paper stencils in different parts of the piece and sponged on brusho that I had blended with water.
You also can rip out leaf shapes from other paper and sponge around them- or sponge inside a hole you ripped out in a leaf shape!
I had picked some leaves and laid them on a stamp pad- pushing down with a piece of paper on top and then stamping them into the painting.


After everything had dried, I went in with coloured pencils and added more details. It's hard to know when to stop!
Hope you enjoyed that and give it a try! Next time I'm going to try to get this effect onto fabric!

Saturday, 28 March 2020

Distressed Butterflies with Transfoil- Garden Mandala part 1


Hi Everyone!

In all the craziness in the world at the moment- there are some bright spots! One is more time to craft! the other is Colourcraft Ltd. delivers!
One project I've been working on is a minature quilt with the theme of "Garden" for my quilt guild's show in October. I thought it would be fun to combine a bunch of different art quilt and embroidery techniques in a mandala whole cloth quilt.
The first art quilt element I did was linoleum cut and printed snails. You can read my blog about doing those here.
Today I'm going to explain how I made my butterflies though! 
I started with quilting all the basic creatures etc I'm going to have through all three layers of my quilt sandwich. This included doing a bit of appliqué and trapunto on my little linoleum printed snails.

Then I took Pastel Pearl Fabric Paint in pink and pearl and painted each butterfly.


I then added dots of transfer foil using fusible web and drew around them using a pink paint pen.


There is fusible on the dots, I lay over the foil and used the mini iron to activate the glue. Let it cool before removing. 

It just didn't feel like enough to me though... so I added some "mending powder" which is basically fusible in a powder form and added more foil. This gave me a random "distressed" effect on my butterflies which I love! 

Here is a picture of the quilt so far:


Next time I will show you how I make the dragonflies! More foil, Angelina and lots of bling.
Take care of yourself. 


Related Posts Plugin for WordPress, Blogger...