Monday 30 July 2018

Rusty Memories - mini-canvas with Ewelina

I love stencils and texture paste but what I love even more is the designIT paste (used tote called: soft form relief paste) because it allows you to create extremely detailed lacy texture that normal stencil wouldn't.


To create my 'laces' I use cake decor silicone molds - you can find a variety of designs all over the internet. Once my lace was completely dry, I removed it from the mold and glued onto the canvas.


Using Copper sprinkleIT, I created ombre effect on the canvas - dark on the lace, going towards white on the opposite edge of the canvas. You just need to keep adding sprinkleIT and water and dry in between layers until you achieve the effect you're going for. It took me 4 layers before I was satisfied with the result.


Using black gel pen, create a frame - don't worry about it being neat and tidy.


To start building up layers of my cluster, I used Tim Holtz phrases which I smudged with some of the Brusho leftover on my desk after working on the background. I also sprinkled some Yellow Ochre Brusho over the area and sprayed with just a tiny bit of water.


Two strips of lace were glued on top and, again, sprinkled with Yellow Ochre.


While that was drying, I focused on distressing some of the embellishments.
Using Sandstone, Yellow Ochre and Vermillion Brusho powders, I added rusty look to a metal medallion, two chipboards and white epoxy frame.


The last step was to layer all of the elements and add some flowers and rusty colour mini stones.


Here is the final cluster composition - as you can see, despite using only 3 colours on all the elements, there is still plenty of shades and depth.


The designIT lace adds a delicate accent to the otherwise quite 'heavy' and masculine composition.


Thank you for stopping by.

Ewelina


Friday 27 July 2018

Art Journaling with Brushos - Video by Susanne

Hi there!

Susanne here today and I'm sharing an art journaling video. I used kind of a resist technique to create the background of this art journal spread. I mixed the ColourCraft Soft Form Relief Paste together with some of the Lustre Paints to add texture to the background.


Enjoy the video!


Here are some close-ups:


Thank you for stopping by today!
Have a wonderful and crafty weekend!
xx Susanne

Supplies:


Wednesday 25 July 2018

Taj Mahal Index Cards with Suzi

Good Day All, For Today's project I decided to have a play with Brusho Powders and SprinkleIt on Photo Paper. 

I took a selection of Brusho Powders and sprinkled a little onto Photo Paper and then spritzed with water.  Some pages I added more powder to the wet pages to get more intense colour.  
The great thing about using Photo Paper is that it grabs the colour and holds onto it; You can move the colour around a little with more water and moving the paper, but you have to be quite quick.  

Another thing I discovered that I really like is that if you put too much water onto your page, you can layer another piece of Photo Paper over the page and it will pick up colour.  You get quite a subtle result with your second piece, similar to a Ghost Print on a Gelli Plate.

You can also use SprinkleIt Powders on Photo Paper, but the paper doesn't grab them the way it does with the Brusho Powders, it also takes a lot longer to dry.  But once dry it is fairly stable on the paper.

As i'm rather inpatient I decided to try mixing the SprinkeIt Powders with Heavy Gloss Gel Medium, as I know this dries fairly quickly, and is permanent once dry.

I used the Copper SprinkeIt Powder with Liquitex Heavy Gel Gloss Medium, mixed it well together then added it to my Photo Paper through a stencil with a palette knife.

I left this page to dry on it own, and the following page I used a heat gun to dry it;
The heat made the Gel Medium bubble, and the Photo Paper shrink and crack.  This give a lovely distressed finish.

To finish my Cards I added a Tim Holtz Sticker, and outlined the stenciled areas with Black paint pen, and added a doodles frame.

I love how these cards turned out, the sparkle is wonderful in real life.  A great way to make striking cards, and quite quick, so great if you want to batch make them.

I hope you've enjoyed my project today.  
Thank you for visiting with us
Bye for now
Suzi
xxx

Saturday 21 July 2018

Shibori Dyeing with Colourcraft Procion Dyes

Hello!
A few weeks ago, I showed you ice dyeing with Colourcraft Procion Dyes- today I want to share with you a different way to dye fabric called Shibori. Shibori is a Japanese method of dyeing fabric- involving manipulating the fabric to form different patterns. Some designs are stitched, but I wanted to show some folding and clamping techniques.


The basic concept is that by folding and clamping your fabrics in different ways, you will get different patterns when you color your fabrics.


My fabric is prepared with the fixer included in the starting kit, and I mixed all my chemicals using the instructions that come with the kit.

Check out the video for more details!


I hope you enjoyed this information and video. This is a great way to make your own fabrics for art quilting or even to do t-shirts and more! 
See you next time.

Friday 20 July 2018

Getting messy with CraftyRoo

Hi everyone, 

Kym here, I am so excited to have been asked along to Colourcraft blog it is such an honour. So, I am relatively new to Brushos but I just love their inky goodness and I have been wondering how they work with fabrics????

Well I got messy! Very messy and had a play, sorry I mean I experimented! And this is what I came up with.....


Now lets get the boring bits out the way first, if you want to be able to wash your fabrics then you need to treat them with fabric medium. But if like me you you have no intention of popping your creation through the washer then go right ahead.

First up I found some lovely cream fabric and an old embroidery hoop. My hoop measured just under 8 inches so I cut my fabric 12 inch square. And then I cut a number of smaller pieces that I would colour for my flowers.

    
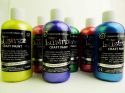
I covered my work surfaces then I popped some Lemon, Gamboge and Crimson into a paint pallet and added water to each to make a very watery paint. Starting in one corner and working diagonally I started with the Lemon, then moved onto Gamboge and finally Crimson.


As I moved onto the next colour I sprinkled more Brushos over the fabric until all of my fabric was coloured.


I sprtized the sprinkled Brushos until I was happy with the results. I finally added Leaf Green over the Lemon to look like foliage and Purple over the Crimson to look like an intense Sunset. My fabric was really wet, so I popped it outside to dry on top of the plastic mat.

Next I started work on the green for the foliage. For this I took 2 pieces of fabric and wrapped them tightly (like you would for tie dyeing). Mixed up a a small bowl of Leaf Green Brusho and water. Attached a paper clip to each of the fabric bundles and submerged them into the bowl - the paperclip stopped them from bobbing up to the top. I left this the soak for about 45 mins.


I then removed it from the water, unwrapped them and laid them down on kitchen roll. The colour wasn't quite as bright as I had hoped so I sprinkled them with Leaf Green Brusho and crumpled them up in kitchen roll to dry them a little, then I left them to dry.

The next technique I decided to try was to soak my fabric until it was dripping wet then pop it on top of a protected surface and sprinkle Brushos over the top and spritz until I was happy with the piece of fabric. Again I left this to dry a little before moving as it was really wet.


When my backing fabric was dry enough to handle I removed it form the plastic mat and hung it to dry. I went back to tidy up and found this.....


I couldn't waste that so I quickly pulled 2 prints from it to use another day!

(I did this to with the blue and orange pieces too!)

When all of my pieces of fabric were dry I gave them a quick iron.


Starting with the background I pulled out my permanent inks and stamps. I used our Junes Monthly Make set, our Chicken wire and Harlequin texture stamp. First up I randomly stamped the Distress panel stamp down both sides of the fabric remembering to rotate my stamp and us 2nd and 3rd generation images.


I positioned the hoop over the background and lightly marked the outside edge. I then stamped the Harlequin texture in the top right hand corner and the Chicken wire in the bottom left. Along the bottom edge I stamped our Funky Flowers Amazing image and Funky Flower Happy in the top left.


Onto the pieces of fabric I stamped the flower heads again and cut these out and started to sew them into place. Before I had sewn them all on I stamped some small Butterflies from Junes Monthly Make set and solid butterfly and left these to dry.


I finished sewing the flowers into place, once I was happy with the background I ironed it on the reverse and stretched in the hoop.

I then stamped some more flowers and leaves using our Beautiful and Grace stamp sets.


Theses were then cut out and positioned onto the hoop, when I was happy with the lay out I started attaching the flowers and leaves into place. And embellished it using beads.


For the butterfly I folded a piece of purple netting and secured it to my glass mat, then stamped the detailed butterfly stamp onto it. I then stitched down the centre of the butterfly to join all the pieces together. The butterfly was then removed from the board and cut around leaving a small border it was then stitched to the hoop.

Once everything was attached the the hoop I re-stretched the fabric and tightened it up again and trimmed around the edge. With the pieces I trimmed off I cut these into strips, frayed the edges and tied them around the fastening on the hoop.


Well, a big thank you for join me for my project I really hope you enjoyed as much as I did!
Related Posts Plugin for WordPress, Blogger...