Good Day All, Today I'd like to share with you a set of 3 cards I've made on the theme of 'Computer Bugs', Sounds a little weird, but hopefully you'll like them. For my cards I used Eco Acrylic Paint, DesignIt Paste,Metallic Acrylic Paint, Metallic Acrylic Ink, Progresso Aquarelle Pencil and ExpandIt Paste.
The Backgrounds for my cards where all created at the same time, so I'll show you how I created them first before going on to show you each separate card.
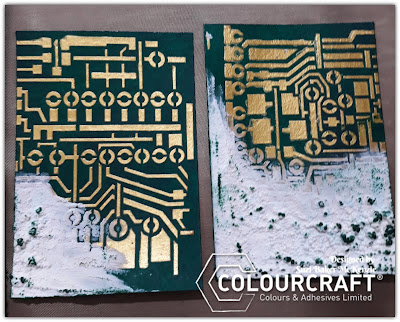
First of All I took some Greyboard and gave it a couple of coats of Eco Acrylic Paint in Phthalo Green;
I then took a couple of circuit board stencils and using a palette knife added a layer of Gold DesignIt paste through them.
I left the backgrounds to dry a little before adding some ExpandIt paste to the bottom right hand corner of them both, I add just a little to one, and more to the other one. I then heat set the ExpandIt with my heat gun.
I decided to cut the second background in half and use it to create to smaller cards. I then added some Dark Green Permanent Ink to the Edges of the backgrounds, and swipe it over the raise areas of the ExpandIt.
That was my backgrounds finished, so next it was time to create my focal points and put the cards together.
For the first card I took one of the smaller background pieces and layered it onto a card blank I'd created from a piece of Gold Mirri Card;
I then stamped some bugs onto Gold Mirri Card using the same permanent green ink, I also die cut the bugs.
I then added the bugs to the card with some foam pads for dimension.
As as finishing touch I added a little Gold Metallic Acrylic Paint to some of the background.
For the second small card I took a Steampunk Beetle stamp, stamped it in green permament ink and then added some gold details with Gold Metallic Acrylic Ink.
Before adding this beetle to the background I added a thin wash of dilute Phthalo Green Eco Acrylic Paint to the beetle and some areas of the background piece.
I then added this background piece to a Gold Mirri Card Blank I'd created, I added the beetle with a double layer of foam pads to give extra dimension.
As as finishing touch I added a little Gold Metallic Acrylic Paint to some of the background.
For my final card I die cut some bugs out of greyboard, aswell as die cutting a larger bug out of gold mirri card. I painted the greyboard bugs with Phthalo Green Eco Acrylic Paint.
Before adding the bugs to the background I added some shading with a Progresso Aquarelle Pencil.
I added some shading in Progresso Aquarelle Pencil around the edge of my background piece before adding it onto my card. I'd created my card blank from a piece of A4 card, so I had an A5 card, onto which I added a layer of Gold Mirri Card before adding my background piece. I then added my painted die cut bugs.
As as finishing touch I added a little Gold Metallic Acrylic Paint to some of the background and the bugs as I felt they needed a little more contrast.
Here's a couple of close ups of the finished card;
I had so much fun with this project, especially creating the backgrounds, I love the combination of Phthalo Green and Gold. The DesignIt Paste goes through stencils beautifully and dries to a wonderfully shiny finish. I love how the ExpandIt looks like some sort of mould has started to grow on the circuit board. I also love those Computer Bugs I created, I hope they make you smile, they did me!
I hope you've enjoyed seeing how I created these cards, It's a pleasure as always to share my creative process with you all. Thank you for talking the time to read this post, I know it's a little long. I hope i've inspired you get creating too.
That's all from me for Today
Bye for Now
Suzi
xxx


Wow, your circuit boards look so realistic with the green gold. The first one is my favourite, although it is a bit creepy with those bugs LOL. Hugz
ReplyDelete