
Fish Project using Angelina Fibres
 |
| Rip Tide |
Guest Crafter
Bixxy Nash
This month I will be working with two elements from the Colourcraft Ltd catalogue that I have never used before. Actually I had never heard of the material before. I chose these items because of this. I like the challenge.
So before I knew it I offered to create a project using both Angelina Fibres and Angelina film together with some other bits and bobs that I have lying around my studio an that would suit the project.
This will mainly be a textile project and I will be using my sewing machine set to free motion stitching. More of this can be found on Youtube if you are not familiar with the concept.
I have also selected some papers and fabrics that I had previously Gel printed and kept in my “maybe later” draw.
 Angelina fibres (warm sample pack)
Angelina Film
Netting from vegetables
Card for template and pen
Iron
Iron on Bondaweb (to secure the stitches if cutting out fish)
Sewing machine
Matching and contrasting threads
Any other scraps of lace or thread
The fibres and the film are selected by colour choice and pulled apart thinly (or as much as you wish) and are fused together by heat, in this instance a medium iron.
They need to be pressed between two sheets of parchment paper (baking paper)
Keep the iron on a medium to low setting till it works for you.
Too hot and the medium will burn . You will know when it does not look right
Play until you are happy with the look that you get.
When the film is heated it is normal that it changes colour and is really beautiful in different lights.

Pull apart the fibres and mix the colours and lay them down on the sheet in a thin layer working out where you want the colours. the fibres and film will adhere to each other, but not to most other things. This in turn will effectively become one sheet of unique material that can be used in sewing and collage. Here I have used the netting from a fruit bag and laid it between the fibres. Other materials such as beads and threads and lace can also be used. I also tried bubble wrap and although the wrap didnt cling to the fibres the indent of the bubble remained.
Interesting!
Angelina Fibres can be found here in various colourways
I recently did a commission that needed to include Mackerel and since then have decided to look a little closer at these pretty fish and this led to my inspiration for this project
 |
| Gone Fishing - by Bixxy Nash 2018 |
This painting is called Gone Fishing is depicting fishing for mackerel in the Solent in the south of England to include a fort and the Portsmouth spinaker as well as the fish on a line.

Reference pic
Have you have ever studied fish? Its amazing how many colours you can see in their skin, especially fish like Mackerel and Tuna being the most common. I did this sketch on craft paper so that the colours showed up more and tried to define the patterns in his upper body. This will be shown in black thread on the finish piece

I began with choosing my colours carefully in both the fibres and the film and laid them out carefully in between baking parchment and pressed them using a medium iron. I inserted some netting to represent the scales and the the colours included pink, yellow and white and the top I used the film Green/bronze.


The result was a fused sheet of fibres and film and net will represent the colours skin of the fish.
The "fabric" is now very easy to cut and shape. I drew around my template to create three fish in total and reviewed the effect.
I cut them out.

I decided to add another layer of film along the top so that the green/bronze would be the stronger colour and made sure each had a piece of netting integrated into the weave

I decided to lay the fish on a piece of Gel printed baby wipe that I had in my "to use later" box. These wipes are great when dried and very manageable in sewing

The effect at this stage is quite subtle and wont really come together until the details are stitched

Here is a close up


I found some calico to use as a total background.
and stitched the details of each fish in black, taking my time with the machine.
You can see this more clearly from the back of the work
(mmm I should have used a larger piece of fabric.....oh well next time!!!!)

Here is the finished piece called Rip Tide
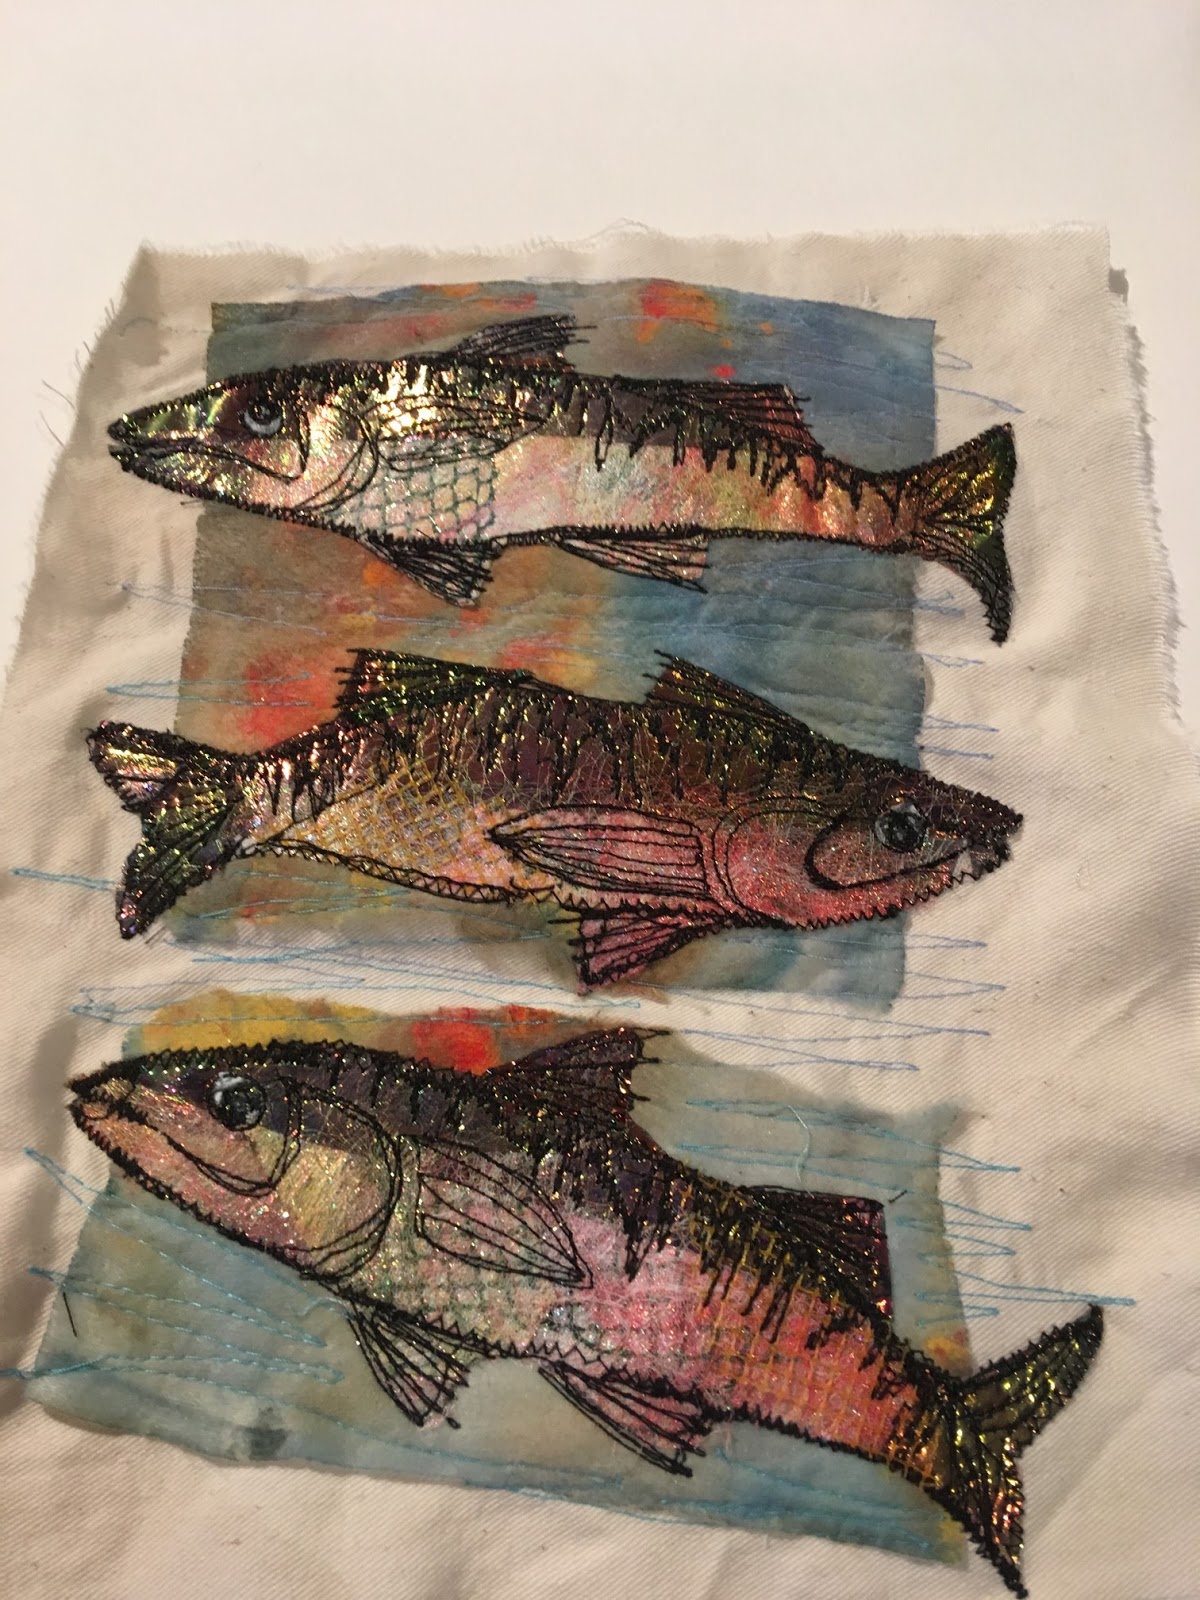

 |
| Rip Tide - Bixxy Nash |
I was very happy with the results of using Angelina Fibre and film and see great potential in future projects.
 |
| Sunday Fishing - Bixxy Nash |
Colourcraft Ltd have many other craft materials for the textile artist and crafters alike. Well worth a browse at their website
I hope this has inspired you to have a go and thank you for reading this article.
If you have any queries at all please free to ask.
Bixxy Nash
These are stunning. Your fish are so beautiful. Thanks for sharing your steps. I have some of these fibers. Maybe need to get them out and play a bit. Thanks for sharing, I love Rip tide. Hugz
ReplyDeleteAmazing fish - the stitching and incorporating the net into the fibres inspiring.
ReplyDelete